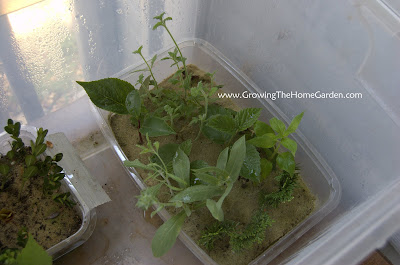
Fancy words like propagation chamber might make you think of some elaborate industrial nursery propagation system with robotic arms that plug plants into mass produced flats of flowers and foliage, but that really isn't the case. At least for the home gardener. A simple home plant propagation chamber can be made with one quick trip to the store.
What Do You Really Need to Build a Home Propagation Chamber?

What do you need to build your own home propagator? Try one large clear or semi-transparent plastic container with a lid. That's all you really need - seriously. You could incorporate mist heads with water lines into the plastic container but for now, especially if you are just starting off with plant propagation, the one storage box is all you need. If you want to add misting capabilities to your box you can find kits at most home improvement stores that can be adapted to fit your needs. Just drill holes where you need to insert the mist heads and add drainage holes in the bottom of the box. I've found that when using the box I only need to water every 10 to 14 days so the mist system doesn't seem that necessary. Otherwise I check the cuttings every couple days for progress or to see if any cuttings are doing poorly.
I Have My Plastic Box, Now What?
Most of my plant propagation involves using sand as a medium. I also use (or I should say re-use) quite a few plastic containers. With the plant propagation chamber I can place my prepared cuttings in their own plastic containers directly into the box, water, and then wait. Before too long the cuttings will be taking off. Just make sure the box stays out of direct sunlight or you could bake your cuttings. The plastic box maintains a good level of humidity without drowning the cuttings.
 |
| Top Container: Boxwood Cuttings, Bottom Container: Raspberry Cuttings. |
These boxes work great for anyone who is interested in propagating plants at home. They are a good way to maintain moisture and get those cuttings out of the house. I'm sure my wife is glad about that!
 What do you need to build your own home propagator? Try one large clear or semi-transparent plastic container with a lid. That's all you really need - seriously. You could incorporate mist heads with water lines into the plastic container but for now, especially if you are just starting off with plant propagation, the one storage box is all you need. If you want to add misting capabilities to your box you can find kits at most home improvement stores that can be adapted to fit your needs. Just drill holes where you need to insert the mist heads and add drainage holes in the bottom of the box. I've found that when using the box I only need to water every 10 to 14 days so the mist system doesn't seem that necessary. Otherwise I check the cuttings every couple days for progress or to see if any cuttings are doing poorly.

