.

Showing posts with label garden projects. Show all posts

2010 Garden Project Review!

Last January I came up with 9 garden projects that I wanted to accomplish. As is my tradition over the last several years it's time to review and see what I actually achieved!

The block areas are from my 2010 project list and the bullets are what was accomplished.

1) First and foremost I need to finish the greenhouse. I'm close, so close I can see where everything is going to be inside, what landscaping I plan to do on the outside, and the potential this project has for my garden. The greenhouse still needs siding, sealing, flooring, insulating, and painting/staining. If I can get it sealed and insulated the rest can wait until later.

  • Structurally the greenhouse is about finished! The siding is done, the sealing is almost done (a few more places to caulk that seem to appear when I'm not looking), the flooring is in progress (I need more free bricks), insulating is done, and the panting is almost finished. The weather changed to cold on me before I could finish painting the doors and windows. I also need to set up the green roof overhang.

2) I want to build at least four more raised beds for the vegetable garden. Raised beds are definitely the way to go in small backyard gardens. The raised beds I intend to put together will be 2'x10' in size like I put together in this raised bed vegetable garden layout.  I also have one more place I would like to install an extremely long but narrow raised bed or a series of beds to move my strawberries into.
  • I managed to piece together two raised beds using leftover lumber and decided to leave the area where the other two were intended to go to remain open ground. I ended up planting 10 mounds of potatoes which  gave us some yummy Yukon gold potatoes to dine on! The strawberries still need moved but that will probably have to wait until after they have fruited in 2011.

3) Build the fence around the vegetable garden! Here's one project from last year that hopefully will get tackled in 2010.
  • Yet again I deferred the fence to the following year! This will be at the top of the 2011 to do list!

4) Landscape the beds in the back of the backyard with a variety of plants and flowers. I'll put together a design plan soon that will show some general ideas I have for the back corner of the yard where the greenhouse resides.

  • The landscaping in the back near the shed is mostly put together. I can't wait to see how it fills out in 2011! Annuals, perennials, and some shrubs and trees (crape myrtles, viburnum, maple, red twig dogwood, and others) will fill it out!

5) Finish the patio sidewalk to the garage door.

  • Like the fence this one was deferred to 2011. Work on the shed took away a lot of time from other projects but 2011 should see results in other areas!

6) Build a decorative bridge! I've been wanting to get to this project for a long time with some old deck lumber I have in the back. Unfortunately much of the wood may be not be usable but I'll see what is and put something together.
  • The bridge still hasn't been put together yet - I still have the wood - I just need the time!
7) Put in some new garden areas on our front hillside. I want to transfer several Russian sage plants from our front garden for use in this new area.

  • The Russian sages have all been moved to new locations and should enhance our hillside garden. I need to mulch once a nice warm day comes along...

8) Redo my front sidewalk garden. The Russian sage plants are getting a little large and need transplanted somewhere, it's a good thing I have a spot for them!

  • The Russian sage plants have found new homes - I can't wait to see them bloom in their new locations!

9) Establish the hillside pathway. We have some pretty large slopes that are covered with weeds and brush. Some of the weeds are welcome because they house beneficial insects but I would like to edge and add gradual steps  up to the top of the slope and eventually landscape the resulting new garden areas.


  • There's still a lot of pathway to make. I need to widen the sides but I kept the pathway mowed and mostly clear throughout the growing season. the biggest issue is the wild blackberry branches that attack me each time I ride up the hill on the mower. They will have to be trimmed back!

It sure looks like my 2011 list will be a long one!

    Garden Project Review for 2009

    It's time for my end of the year garden project review. In the remote case you don't know what I mean I'll explain. This is where I go back and see what I actually accomplished from among the lofty project goals I established on January 1, 2009. I'll have a new set of projects for 2010 very soon but some will be a carry over from 2009.

    Let's see how I did!

    1. Prepare and plant the self-seeding garden. I'll have a specific post up for this idea later in the week but to sum up my plan I want to create a garden with easy to grow annuals, biennials, and perennials that will seed themselves year after year.


    The self seeding garden was double dug, planted, and enjoyed throughout the summer. We'll have to see what comes up this year but the 2009 occupants included the following: Black and Blue Salvia, Zinnias, Verbena, Sunflowers, and many others. It was also enhanced by the arbor project.

    2. Propagate plants, propagate plants, propagate plants...did I say propagate plants? (Especially more salvias and Russian sages!) I want to put more Russian sage (Perovskia atriplicifolia) in more places. It's deer tolerant (which is extremely important here), looks great, and thrives in full sun. I want more salvias for the same reasons.

    This was a given, of course I would propagate plants! I added more salvias and Russian sage as I listed above but attempted anything I could get my hands on! (Beautyberry, Viburnum, Sedum (leaf cuttings), Asiatic Lily (leaf cuttings), 'Powis Castle' Artemisia and several more.) 

    3. Build an arbor as an entrance to the shady corridor. I accomplished this as a part of the Better Homes & Gardens 48 Hour Blog Challenge. You can see it here: An Entry Arbor , learn how I built it here:How to Build an Arbor, and vote for it here: 48 Hour Blog Challenge.


    Even though I didn't win the $5000 in the project it was still very cool to put together the arbor. Better Homes & Gardens paid for the project and gave me a bonus $100 for completing it. The miter saw I bought with the $100 is coming in very handy for my greenhouse project!

    4. Design and implement the shady corridor. On the eastern side of our house I am creating a shady area that will serve as a cool transition to the backyard. It gets morning sun now but a row of hemlocks and a small grove of other trees (redbud, crapapple, crape myrtle, and witch hazel) are planted at the edge of the property and will eventually provide shade for the garden passage.

    The shady garden corridor is still a work in progress but the new entry arbor definitely sped it along. All I need to do is wait for the plants to grow. The crape myrtles I planted grew very well over our wet summer and should put on some nice growth in their second year.

    5. Build a fence around the vegetable garden. A nice picket fence is just what our garden needs.

    The garden fence hasn't been started yet. I came up with a couple designs and posted about it but I became sidetracked with building my greenhouse. The fence is something we really would like but we decided that getting the lawnmower in the shed portion of the greenhouse was more important than the fence. That way my wife can park in the garage!

    6. Expand the vegetable garden. I need a little more space to grow more vegetables. I'll eventually add more raised beds to the garden and I need space for corn. Edit: I've put together a new raised bed vegetable garden layout that will organize the garden much better than what I had.

    I expanded last year and changed from an "L" shaped raised bed vegetable garden layout to a more conventional design. I still have some more places to build raised beds in the garden and hopefully I'll tackle building some more raised beds very soon.

    7. Lay the sidewalk brick that will connect our patio to another sidewalk. There is a short stretch of ground from our patio to the garage backdoor that I would like to cover with a walkway.

    Here's another project that got sidetracked due to the greenhouse. It will be carried over to 2010 along with the garden fence project.

    8. Expand the birdbath garden. It needs a beautyberry somewhere and a couple more ornamental grasses.

    I did expand the birdbath garden but not exactly as I intended. I added a large sitting rock, a physocarpus (ninebark), 'Powis Castle' Artemisia, and a few other plants along the way. I added the beautyberry in another location because I just had to have one somewhere!

    9. Build my rustic log bench. I still have two chunks of trees that I brought home from my in-law's tree cutting extravaganza last year (2008). I need to strip the bark, stain them, then add the bench seat made from reclaimed deck lumber.


    Yet another little project I never finished! It's an easy one but not a high priority. The stumps do pretty well for sitting spots as is. The neighbors cats enjoy it and so do my kids.

    10. Create a pathway for the shady garden corridor. I haven't decided if I want to put stepping stones laid into the grass, create a gravel pathway, or use reclaimed bricks (I'd have to find some of those). A moss cover brick pathway would look pretty nice I think!

    For now we've decided to just use the grass. Any bricks or stones I come across will become flooring for the greenhouse. When I decided to do the greenhouse quite a few priorities changed with my project list but we'll see if I can get them done in 2010!

    Tomorrow I'll have a list of my 2010 projects. What projects do you hope to tackle in your garden in 2010?

    Garden Project Review

    This post is a post I've been dreading.  Mainly because this year has been tough, probably the toughest I've ever had to live through.  My garden projects fell by the wayside.  My projects and ambitions just didn't matter when compared to the situations that the course of life brought us through.  But we're getting through things, day by day.  I don't mean to end the year with a downer post but really I don't think I can write this post any differently. Dad's death took a lot of wind out of my sails and effected my projects and even this garden blog.  Suddenly things that were important to me didn't feel that important.  Stuff was set aside and I even stopped visiting many of the bloggers who I read regularly.  Reading fun and interesting articles about my favorite subject (gardening) suddenly wasn't so fun and interesting and even writing about my gardening experiences became difficult. (To any garden bloggers who may read this post please accept my apology for not visiting recently.)  One of my goals for 2015 is to regain my enthusiasm for garden projects, garden blogging, and all things garden again.  That enthusiasm isn't gone, but it has been dormant since July.  I suppose in a way I've trudged through things with a mindset similar to that of a writer with writers block.  The writer just has to plow his way through it.  He has to write and write and write until the ideas flow again.  That's what I must do in 2015, garden and garden and garden.

     I can review my garden project progress --- which wasn't good...

    I always end up biting off more than I can chew - metaphorically speaking of course.  To a certain extent it's intentional, so that I stay motivated and end up getting a lot done even though I know I can't do it all.


    1) Build the vegetable garden fence!

    This has been on my list for two years without much progress. Alright, without any progress! The deer have invaded my vegetable garden multiple times which means there needs to be a way to prevent future incursions tied in with whatever fence build.


    My Project list began with the vegetable garden fence I've been hoping to build for several years now.  Did you read the post I wrote about the fence?  Me neither, I never wrote it!  That fence is still on the list but hasn't progressed beyond the planning stage. 

    2) Finish the new garden beds.

    I have three areas in our front yard that need mulching and filling in with plants. One area is around our Yoshino Cherry tree and is filled in with a bunch of plants already including irises, coneflower, dwarf crape myrtles,  daisies, and a few other plants. Another area is halfway mulched but I stopped when I discovered a nest of ground wasps. I need to figure out how to get rid of them! The third area is a garden on a slope that will be filled with Russian sage, catmint, salvia and several other favorites that are easy to propagate!

    Here's one project that actually was tackled.  Although technically a garden is never "finished".  Currently those gardens are filled with plants and mulch which will allow me to claim completeness for the project!


    3) Make more stepping stones for our side walkway area.

    I made a few last year and I need enough to connect the area around the arbor to the backyard.


    Those stepping stones aren't done yet.  One of these days...


    4) Repair a couple raised beds.

    My beds are made with untreated lumber and after 3 years in the weather a couple of them are falling apart. My plan is to move four 2'x4' raised beds and place them together in the location of the 4'x8' raised bed that is falling apart.

    This project is kind of done and kind of not.  I moved the raised beds around and accomplished my plan but as usual my plans change!  The parterre design plan I want to gradually change the garden into is partially in progress and a necessary part of it was the removal of a few beds.   garden season many of those beds were in such bad condition that I simply removed them entirely.


    5) Build a central circle raised bed in the vegetable garden.

    The four beds I'm planning on moving for the previous project will leave a gaping hole in the center of the garden. I have about 17 concrete retaining wall blocks laying around that should make a great central circle.


    Here's another project I can claim completion on! The circular raised bed grew lettuce and pole beans this year.


    6) Gradually adjust the vegetable garden into a parterre vegetable garden.

    Parterre layouts are very cool and are both decorative and functional. In the process I'll eliminate any grass pathways in the garden and replace them with mulch - no mowing in the vegetable garden!


    I mentioned this a couple projects ago in this post.  The northwestern corner is partially transformed but it looks much more like the picture in this post called Vegetable Garden Layout Parterre Style.  Although after looking at that photo I realized that I changed things again.  As the head gardener here I reserve the right to edit my garden as I wish!


    7) Build another arbor.

    I've collected all the materials for a nice arbor to be build near the garden shed. It will be wide enough for the riding mower to easily run under and will get covered with a Sweet Autumn Clematis that will be relocated from my deck - those things need places to roam!

    I really couldn't wait to get this project done.  But I did, so I guess I could!  It's on the list for 2015.  It looks like that 2015 list will be a doozy.  


    8) Fix the deck.

    I'm not sure what I can do here yet but one rail on our deck has warped to the point where the whole rail needs replaced. Hopefully I can enhance the deck in some way during the repair process.
     I can rig a simple fix but wouldn't a new deck be better?  Just musing here...


    9) Build the garden bridge!

    I'm really wanting to get my reclaimed deck lumber used for this project and soon. A nice oriental style garden bridge is just what my garden needs - well not really "needs" but the garden does want it...
    No bridge to nowhere, not yet anyway!  


    10) Finish the patio walkway to the driveway.

    I built the patio two years ago expecting to add the walkway last year but that got away from me. This year for sure!
    Well I have a stack of paving stones sitting out back.  Too bad they won't hop into place on their own.  If they would I could claim another one down, but alas animated paving stones haven't been invented yet.


    11) Finish the garden shed.

    I'd like to paint the inside a nice reflective light color to increase the light. I'd also like to enclose the roof rafters in some way to improve the heat retention.


    The garden shed is still needing attention.  Painting, work on the reclaimed windows, laying more floor, you name it.  It's very much still in progress but I just haven't been able to get to it.  I actually have more paving stones ready to go in, I just need the time and motivation to get it done!

    As you can see my ambitious project list fell woefully short of completion.  Perhaps 2015 will be a much kinder year to our family and more of these projects can be completed.  We'll see though.  One thing I know for certain, that nothing is for certain!
     

    Greenhouse Update

    I just posted another greenhouse update that includes pictures of the new trim that is enclosing the eaves and along roof line. It's progressing nicely and the roof is all enclosed!

    Indoor Hanging Wall Planter Garden

    I finally managed to get my Indoor Hanging Wall Planter Project up on the wall!  I ran out of screws so I'll have to run to the store to pick up a couple more and make sure it stays up securely.  It's fine for now but I definitely need those screws attached before adding pots and soil for plants.  I picked several seed packets with different varieties of basil as well as one packet of lavender seed to plant.


    The LED light rope does a good job of creating ambient light around the wall planter but does make enough to serve as an actual plant light.  Since it's energy efficient it will make a good light in the evenings when it gets dark to help find our way through the room.  Our bonus room can be a minefield of children's toys that can invoke dire consequences to the barefoot parent!

    The whole project cost less than $100 to put together which was provided by Lowe's Creative Ideas!

     Once I have some little plants growing I'll let you have another peek!

    Reusing Materials for a Cold Frame

    Over the weekend I spent about 30 minutes piecing together a cold frame to do some hardwood cuttings.  The process for building a cold frame is very similar to building a raised bed.  I used some old pressure treated lumber that used to belong to a deck, an old storm door without the glass, and a couple 4"x4" scrap pieces to make some secure corners.  Pressure treated wood, depending on its age, may contain arsenic but newer pressure treated wood used copper based treatments to preserve it.  Since this bed is for cuttings and not vegetables there's no reason to worry about the arsenic.  (I suspect the wood I'm using was treated with the copper treatment.)


    I cut the wood to fit the storm door then used some 2" deck screws to secure it to the corner posts.  A flat surface is very helpful - mine wasn't!  Underneath the bed I laid a thick layer of newspaper to prevent any weeds from rising up and through the bottom of the bed.  Then I placed a plastic mesh that I had on hand to protect my trees from deer. I have voles in my yard and I need to protect the bed from them.  Most likely they will be able to nibble through the plastic but its what I had on hand.  I may get some 12" paving stones to place under the bed to discourage them further.

    Once I had the bed itself in place I used the storm door hinge and screwed it directly to the bed.  I need to come back and place a piece of plastic over the storm door opening.  The glass went on my shed's skylight a couple years ago so I don't have that available.  I'll come back and fill the bed with a rooting medium which will probably contain a mix of peat, sand, and perlite.


    From start to (almost) finished this bed took about 30 minutes to put together and could hold between 200-300 cuttings.  For cuttings I'll probably start with some viburnums and crape myrtles.

    The Completed Light Post with Bird Feeder Project!

    Here's just a quick post to show you the light post made from a front porch post that I put together for Lowe's Creative Ideas.  Finches, wrens and cardinals have all been sighted visiting the bird feeder.  As an added bonus the birds get to land on the two hanging baskets to hang out and visit.  It's almost like an airport for birds complete with landing pads, runway lighting, and even a food court!

    Inside the coconut coir hanging planters I planted pansies for the winter.  I think plants that spill out over the edges would be perfect for the hanging baskets.


    This next month's Lowe's Creative Ideas Project is called "Migration." It looks like we'll be finding a way to bring the garden indoors!  Who knows - maybe I'll bring the indoors to the garden!

    Front Porch Garden Remodel Part 4

    Today I thought I would show you the before and after since yesterday I teased you on the details of the front porch garden remodel. It's current state is still classified in the unfinished category but it is well on its way to becoming a welcoming front porch garden.

    First let me show you the before pictures:

    The crabapple is front and center in the garden with the hollies along the porch. Two ragged Russian sages that need moved are standing on either side of the crabapple. The 'Powis Castle' artemisia is a bit overgrown but we kind of like it there so it might stay! Please ignore the weeds. I've kind of let this garden go since I was planning on re-doing it eventually!


    Here's the other side of the garden with the same plantings as above except for the crape myrtle on the left. Irises and daffodils will brighten up the area in the spring. If our weather had been more cooperative the salvia would be blooming right now, but everything has been way too dry.


    The in-progress photos:


    Removing the hollies was the toughest part. I tried to save them but eventually gave up and ended up clipping them to the trunk and digging the main parts of the roots. I may end up with hollies again so I'll have to watch for those volunteers from the leftover roots. Digging in clay and gravel is very difficult, but you probably know that!


     From the side sans hollies.

    In this picture all the plants are removed that need to be. I still want to move the Russian sage but I need to wait until dormancy or at least when rain is in the forecast. 


    The after:

    It's a little hard to see what I'm doing here but if you look closely you'll be able to tell. I planted two 'Otto Luyken' Laurels in the middle and left a space for a third. I only bought two since they were on the discount rack for $6 each - and really they looked great! On the left and on the right are my splurges two 'Winter Snowman' camellias. It's a relatively cold hardy camellia rated to a zone 6 hardiness. I couldn't pass up an evergreen planting that blooms in November and December!


    Here we are from the side. You'll notice that the plants are spaced a good distance from the porch. I did that so that the plants were out from underneath the roof overhang of the front porch but also to give them space to grow.


    Here's the other side. It's hard to see the plants with the Russian sage still present but as foundation plantings grow and the Russian sage is moved you'll be able to see it much better. All the plants are smaller plants which generally means cheaper on the wallet! It's also good because smaller plants tend to adapt quicker to their soil conditions. I did attempt to improve the soil a little by adding two wheelbarrow loads full of compost to the top of the soil. I didn't work it in but eventually it will be buried underneath mulch.


    The plants:


    'Otto Luyken' Laurel

    'Winter Snowman' camellia
    It's coming along and I can't wait to see it complete. A little mulch, a little weeding, a little transplanting, and soon it will be good as new!


    Front Porch Garden Remodel Part 3

    Today I started another segment of my Front Garden remodel. If you recall from my previous posts on this particular garden I wasn't pleased with the builder's special hollies and the crabapple I had there. The crabapple was free tree from Arbor Day that I planted in a completely wrong spot. I do that sometimes I get a plant going then just stick it in somewhere only to have to move it somewhere else later.

    My plant was to attempt to save the hollies and move them elsewhere in the yard. I also wanted to see if I could move the crabapple. Unfortunately the crabapple turned into an exercise in futility. I had so much trouble digging around the base of the tree due to the clay and gravel leftover from construction that I kept finding everywhere. I also kept running into daffodil bulbs that I didn't want to damage which led me to give up on the crabapple. Out came my bow saw and down came the apple tree.

    The hollies were a slightly different story. They were large and had mostly pot bound roots. I had to give them a severe pruning in order to get close enough to the root balls to dig. Once I did that I tried to save as much of the rootball as a possible on the first two which took a long time. That's when I decided to not worry about saving them. I found as I removed them that the roots were circling each other and they were planted a little too close to the house for their size. Plants should be planted at about half the distance of their ultimate width away from the house. These were way too close!

    I managed to get all five of the hollies, the crabapple, and a spirea removed from the front porch garden. The spirea was transplanted to another location.  I still need to remove several 'Emerald Gaiety' euonymouses and transplant two Russian sages, a lavendar, and several New York Celeste asters. I'm waiting on transplanting the Russian sage until after dormancy since they're finicky when transplanted otherwise. The asters already bloomed and really could use a dividing to rejuvenate them for next year.

    I'll show you some before an after pictures in my next post - stay tuned!


    Building a Plant Holding Bed

    A plant holding bed is a luxury that anyone who propagates plants might find very useful. (I know I will!) A plant holding bed can function as a coldframe or just as an out of the way spot set aside for plants to rest in while they grow. For me I just have too many propagated plants to continue storing them on our front porch - that's not what a front porch is for is it?  Building the hold bed was simply the next logical choice!

    How to Build a Plant Holding Bed

    This isn't rocket science but building a raised bed does require some thought. I spent some time (several minutes ;)) trying to figure out a good location that was out of the way and doesn't utilize yard space that we are actively using. The lower portion of this slope near the garden shed seemed ideal. It isn't close to the house but with an extra long garden hose I can get access to water. I'm also hoping to add a rain barrel to the side of my garden shed which would make an easy and free water source nearby.


    The next step was actually figuring out the shape I wanted and staking it out. By staking the outline of the beds I could remove the soil and dig the bed into the slope of the hill. I left a lip on the back side of the beds  to prevent runoff water from going straight into the raised bed. I used a tiller to break up the surface of the soil, a rake, and a shovel to level the ground above the holding bed.


    Then I set about building the rectangular portion of the bed. I used corner posts to screw (deck screws) in the boards which makes it easy to square off the corners. (Dimensions 4'x8') The corner posts are measured to the height of two board widths to make a nice fit (approx. 11 inches).


    After the first level of the rectangular center bed was built I added the triangles on either side. The back board is 4 ft. long which I attached using another corner piece. The long hypotenuse side (geometry was a very useful class!) was measured and cut using 45 degree angles on the ends.


    Here is the location after the first portion of the bed was built. 


    Once the bottom level was complete it was easy to measure and cut the remaining board for the top layer.

    The next step will be to add a cover to it to prevent our resident wildlife population from enjoying the plants more than I do! I have two thoughts on that:

    1. Use a PVC pipe frame with a plastic mesh over it or 
    2. Build a wood frame with a mesh. 
    The wood would look nicer but PVC is be light weight and cheap. And I really like cheap! The wood also gives me added support if I choose to lay a window over the bed to covert it into a cold frame.


    Here's where you can see how it fits in with the landscape. The future bed will house many of our strawberry plants that have overtaken the vegetable garden. That bed will be almost 27 feet long and will help to create a terraced hillside look. In between the two beds is a pathway wide enough for the riding mower to journey through.


    I'll post more on the hill-scape when the next section is added!

    Plant Holding Bin and a Birdhouse (Weekend Projects)

    This weekend I worked on two garden projects. One took a a good deal of time to complete while the other only took about an hour and a half.

    The big project was a plant holding bin to hold my propagated plants that aren't ready for in the ground planting yet. Fortunately I was the recipient of some old deck wood a couple years ago that since then has been resting comfortably in the back. Amazingly it is still in pretty decent shape after two years of sitting through our weather. I'll write a full post on its construction later this week but here is the finished product:


    It's essentially a set of three raised beds that will be nestled into the slope of the hill. The middle one is 4'x8' and the two triangular raised beds are 4' on two sides and about 5'8" on the slope side (remember your Pythagorean formula here!) The bed on the left is in the shade for most of the day while the center and right bed receive part shade. Eventually there will be another bed further up the hill for some other plantings. This slope is part of a larger project to make a couple tiered gardens. So far I haven't spent any money on this project since the wood was old and donated and the screws were left over from garden shed construction. I need to add a lid that will keep the rabbits and deer from munching on my plants.

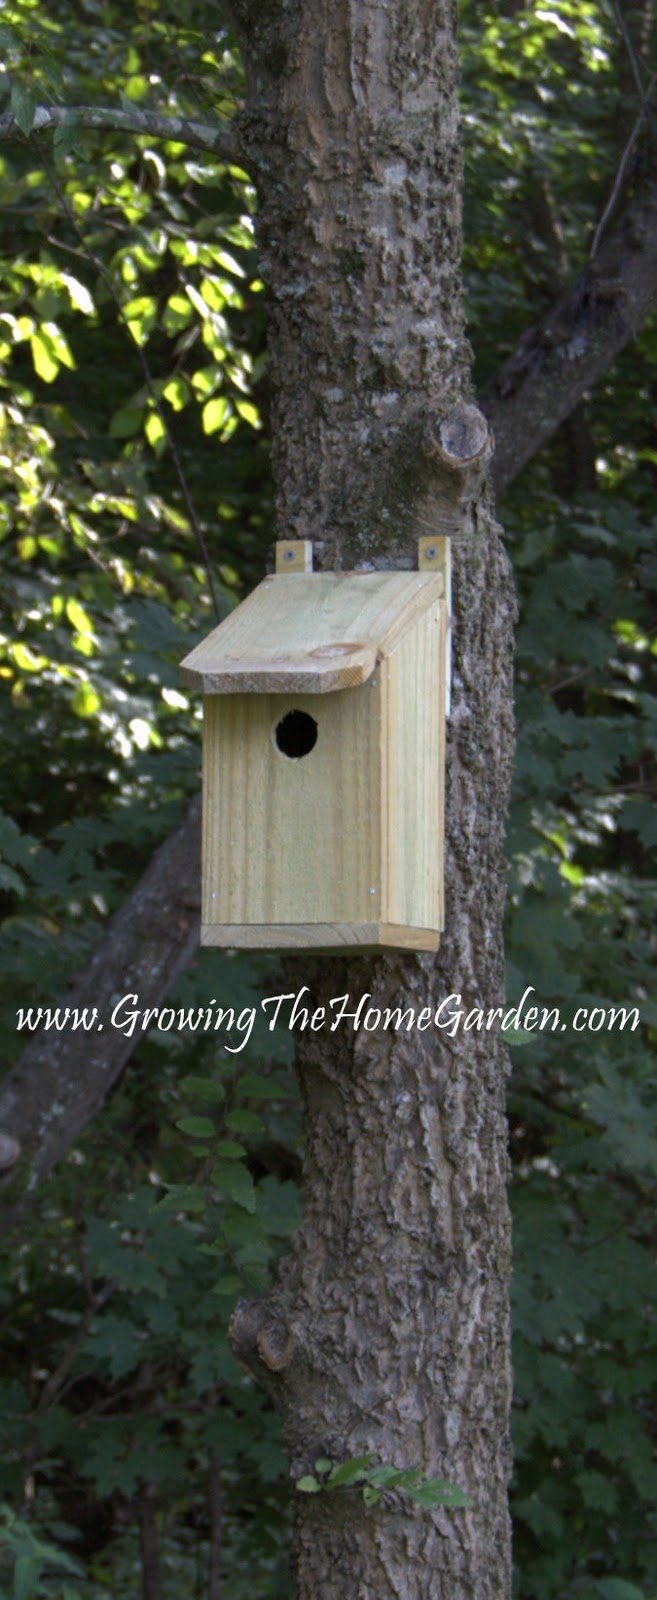
    The short project of the weekend was a bird house. I've been itching to add one to the yard and had this idea to use a dogeared fence board to make one. It was a very easy project and came together quickly. I pre-drilled hole then used finishing nails to hold the sides together.  If you don't pre-drill holes you risk splitting the wood. (I'd say chances are about 90%!) I didn't use any written down measurements and sort of improvised the bird house. Many websites have the ideal dimensions for certain types of birds and I actually printed a list off of one of them but lost the list! The birdhouse turned out fine though for a first attempt. I'll improve upon my design with the next one. It was so easy to do that I have to make a few more!


    Building a Paving Stone Pathway

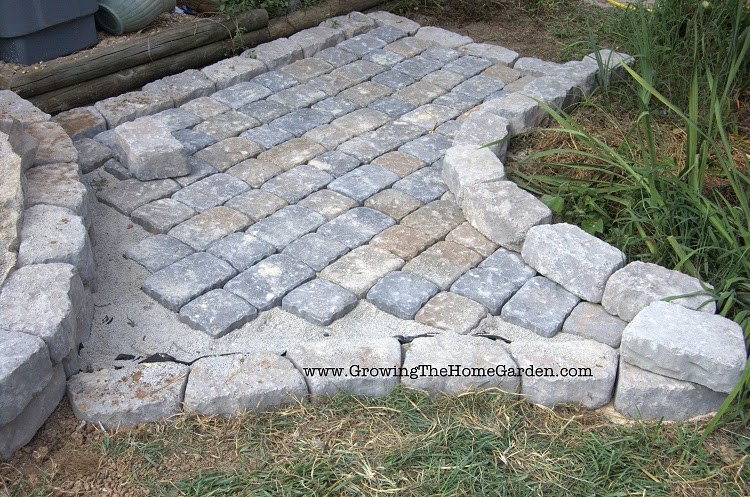
    Several years ago I built a patio using paving stones. I intended to complete the patio by adding a sidewalk that would bring the paved surface area all the way around to the garage and driveway. This weekend I finally made major progress on this neglected project. Making a paving stone patio, sidewalk, or pathway is not an easy task. It's not that building a patio is complicated but rather that the stone can be heavy and the work is repetitious with a good deal of digging, bending, and lifting. Excavating a space for the project can be difficult too depending on the soil type but this project is definitely one a determined gardener and homeowner can accomplish! I purchased my materials at Lowe's in conjunction with Lowe's Creative Ideas.

    Using paving stones to build a pathway, patio, or sidewalk.

    The first step in building a paving stone project is excavating a level area. In this project I had to accommodate a rise in the grade that moved up to an existing sidewalk. I planned on building a two step sidewalk using retaining wall blocks as the step risers. I also used retaining wall blocks as the borders for the step areas as they are heavy enough to keep their contents in place.

    Once the soil was excavated I mapped out where the patio sidewalk paving stones were going to be. I set the retaining wall blocks in place and planned how the stones were going to go. I allowed for a lawn step off location in the lower level that would be even with the soil grade. Once the outline was made I adjusted the grade more so that the soil would angle away from the house. We want water to flow toward the yard and garden not toward the home!


    After leveling the soil I put landscape fabric down. This would keep the paving stone base gravel and sand from mixing with the soil underneath. It also keeps the weed seeds that may be still in the soil from germinating and penetrating through the patio. Then I covered with paving sand and paving gravel. The fine particles make setting and leveling the stones easier.

    Using paving stones to build a pathway, patio, or sidewalk.


    Finally (for this post) I used the patio paving stones to create the walkway. I used a combination of 6"x9" and 6"x6" stones. I set each stone making sure that they were level and even with the other stones. I set the paving stones visually but using a level string line and stakes can help insure a perfect installation. When put together a group of four of these paving stones would cover a 15"x15" area or 1.56 sq. feet. To do a 10' square patio you would need about 128 of each type of stone. Taking measurements in advance and planning out your project is important because now I need to make another trip back to the store to complete this walkway!

    Using paving stones to build a pathway, patio, or sidewalk.


    Using paving stones to build a pathway, patio, or sidewalk.

    Check in again or follow the Growing The Home Garden Facebook page for updates! Part 2 will be coming soon!

    Using paving stones to build a pathway, patio, or sidewalk.

    Disclosure: Lowe's provided the funding for this project in conjunction with their Lowe's Creative Ideas Program. All work, writing, and opinions expressed are my own.