.

Showing posts with label containers and pots. Show all posts

Decorating Planters with Branches for Christmas

Here's the situation. I have two pots on my front steps which each house an arrangement of Dusty Miller and cordyline.  The problem is the cordyline is looking a little worse for wear.  It's not supposed to be hardy here in Tennessee but so far it's stayin' alive, stayin' alive despite cold temperatures in the mid to lower 20's. It's also Christmas time and a little festive holiday spirit would be a welcome addition to the front porch area.

So here's what I did.  I took cuttings of several large branches of a red twig dogwood, an eastern red cedar (Juniper), and some berries from a nandina.  Then I added the evergreen juniper branches to the soil.  (I had to wet the soil first because the soil in the pot was frozen!)  I arranged the juniper branches to shield the cordyline from view and to offer them a little more winter protection.  Then I placed the red twig dogwood branches where they would be highlighted against the evergreen juniper background. Last I added the nandina berries to the pot.  I didn't want to remove a bunch of berries from our nandina since we have only the one but a couple bunches of berries from the back of the shrub won't be missed.

Here's how the arrangement looks now:


I could probably squeeze in a few more red twig dogwood branches and maybe some pyracantha berries.  Maybe I'll change out the red nandina berries for the pyracantha after the New Year. I wouldn't bet $10,000 on it but there's a possibility that could even have some rooted shrubs in my potted arrangement by spring!


Now I just need to add a big old Christmas bow!


(Also if you need a laugh this morning feel free to read about the Nandina that saved my garage and lawnmower!)

What I'm Growing on the Porch

For several years before we bought our house we lived in an apartment.  I still had the gardening bug and couldn't resist planting a vegetable garden in pots on the porch.  While today I have ground to plant in I still utilize the porch and deck on our house to grow a few plants.  Here's a look at a few porch and deck plants we're growing.

I planted the coral red honeysuckle but the blue morning glories were volunteers.  Morning glories are beautiful plants but can be very prolific if allowed to go to seed.


I plant moonflowers every year.  The extremely large white flowers that open in the evening are fragrant.  I planted 3 of these along the front porch but they did not all grow as I had hoped!


Vine plants work great on the porch rails but that isn't all you'll find on our porch.  Check out this Japanese maple called 'Beni Schichihenge' I bought this year. 'Beni Schichihenge' sports variegated foliage.  I put it in a pot since I wasn't sure where I really wanted to plant it yet.


The front porch also has quite a few of my propagated plants.  Hydrangeas, variegated weigelia, beautyberry bushes, heuchera, and mums.  There are also some hostas that I've potted up and haven't planted yet in their new homes.  I have a good area for that now so I should get out there and let them get settled in before the cold weather gets here.


These heucheras were made from one small segment of a stem that I cut into severn pieces.  I made sure each piece had a portion of the stem and one leaf.  All but two have put out new leaves since the cuttings were made.


Here are some hostas I ordered earlier in the year. To the right side of the photo are several 'Longwood Blue' caryopteris plants I propagated.  The caryopteris row is in boom right now but I'm afraid we're getting too much shade over there for them to stay in that spot.  To insure I don't lose a plant when transplanting  I make a few cuttings and plant them where I want them.

Mariessii hydrangea is a variegated hydrangea variety with lacecap flowers.


Here is a variegated weigelia.  I bought the plant last month on the discount rack and planted it.  I made two cuttings from it then the main plant died!  That's why I like plant propagation!


I use the back deck for potted herbs that enjoy more sunshine than the north facing front porch gets.  the back porch holds three types of mints including apple, orange, and a mystery spearmint I found growing wild.  That mystery mint has some of the best spearmint flavor I have ever tasted!  I normally plant mint in easily controlled areas since it typically spreads like wildfire.  This fall I hope to build a  couple raised beds in the yard just for our mints and other herbs.

The back deck also is home to our potted stevia plant.  I was amazed that this tender perennial came back last winter.  I fully expected it to succumb to the cold winter - but it wasn't a cold winter.  I'm not taking any chances with it this year.  Since my stevia is in a pot I can bring it indoors to overwinter.

Our chives, which are now flowering, are on the back deck too. Very convenient to the kitchen!


Don't let the fact that you only have a deck or porch for your outdoor area limit your gardening experience.  Lots of plants are easily grown in pots!

A Quick and Easy Rustic Planter

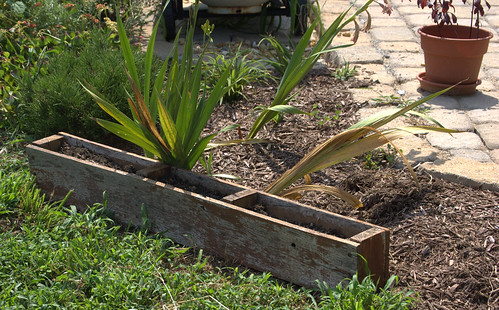
The other day I came up with an idea for a rustic planter. I had this piece of a pallet left over from my old potting bench that I didn't have any particular use for. The old pallet itself was the table potion of my previous potting bench and I cut off a piece of the pallet to make the bench a little more narrow and easier to reach across. I hate throwing things away (my wife hates that I hate throwing things away, but that's another story) and I came up with the planter. Part of this piece had ends of 2"x4"s sticking out and I planted them in the ground like little posts with the smooth side up (smooth is a relative term here) then filled it with soil.


When the weather cools enough I'll plant some pansies or other cool season flowers inside. I'll shy away from edibles since I have no way of knowing where that pallet has been. I stained it for use in the potting bench and don't particularly like the thought of consuming chemicals. You could make quite a few of these from one pallet to add to your garden as border planters. You could even paint them to fit whatever look you like. How's that for a new use for an old piece of junk?

How have you reused old lumber lately?

Arborvitae in the Home Garden

Arborvitae is a very nice plant for the home landscape. Also called Thuja occidentalis, arborvitae is an extremely versatile evergreen tree in the landscape. It can be used as a foundation planting, privacy screen, or even as a windbreak. These columnar evergreens tend to evoke a formal mood in the garden. There are cultivars that range from 2 feet in height all the way up to 40 feet tall, so if you decide to add it into your garden make sure you choose the right place for the height and spread of the cultivar. (The forty foot variety wouldn't do well next to your house!) If you plant it as a privacy screen keep the spread of the trees in mind as a thick privacy screen will need to be planted close together.

This weekend I planted five 'Emerald Green' arborvitae in pots to serve as a backdrop for my brother-in-law's wedding. 'Emerald Green' Arborvitae grows to 15 feet tall and spreads out to about 4 feet wide but these particular trees were about four feet tall. Their potted homes are only temporary and after the wedding the trees will be planted into the landscape to serve either as a privacy screen or as a foundation planting. The pots also added a little bit of extra height for the background.

The exact location for the ceremony had yet to be determined (there is an issue with the location of the sun at 7:00 PM) on Saturday but since the potted arborvitae are somewhat mobile that doesn't matter. They can go wherever we take them...well, almost!


A Container Planting for Mother's Day

This week I put together a container planting as a present for my mother on Mother's Day. I couldn't talk about it here as a post until after today since she checks my site regularly. This was my first real attempt at arranging a decorative container. I've gardened in pots for a long time but it was usually vegetables with the occasional one or two decorative plants in a pot. I tend to think of putting plants in the ground rather than containers but after this experience it may be something that I dabble with in the future. It was kind of fun to find the right plants to fit together to match the right kind of container.

If you think about it there are so many possibilities with pots. The container could have been a square planter, a pedestal planter, terracotta, plastic, glazed, colored, molded, concrete, handmade, or one of many other possible options. Here is what I picked.

At first glance you would probably say that it was a glazed terracotta pot. That's what I would guess but I would be wrong. It's really made of fiberglass! A fiberglass container has some advantages over its terracotta cousins. It's lighter and much easier to move around. You also have the flexibility to easily add more drainage since all that is needed is a drill to put a few more holes in the bottom.

Once I found the container it was time to go to the part that was the most fun: Finding the Plants! When I was searching one plant really stood out as a good centerpiece for the container.

Meet Cordyline australis 'Red Star'! This plant likes it in the sun and partial shade. It's hardy down to 15 degrees Fahrenheit so it may not overwinter outdoors well here in Tennessee, but it could excel as an indoor houseplant and a summer patio plant. It's a native to New Zealand where it grows up to 20 feet tall at maturity. It's a member of the Dracaenaceae family and does well in drought but as a container planting it will need regular watering as all container plants tend to dry out fast.

The cordyline became the tall specimen plant in the back of the container and now I needed something to stand beside it. Something colorful that would blend well with the burgundy colored foliage and reddish tint of the container. I found something that would work, Helenium 'Dakota Gold'. This helenium is an annual that has nice yellow flowers that blend well with the burgundy cordyline. The foliage is also very different being green and narrow, yet still kind of grass-like.


Now what could I put in the front of the pot. I wanted something low growing and colorful. With all the red-tinted colors of the pot and the cordyline I thought yellow might be a good option again. I picked some 'King Edward' Yarrow (Achillea lewisii) that would work well in the front of the pot. It's a low growing pale yellow flowering plant with a maximum height of six inches. That may vary depending on soil conditions. I bought two of them thinking that they would both fit in the pot but I was very wrong. Too bad I didn't have the container with me when I was plant shopping.


I wanted an intermediate color for the container. Something that wasn't yellow but wasn't red either. I found these marigolds that fit the bill. One six pack of these annual flowers was enough to fill the gaps on the sides of the container, provide a little height behind the achillea, and add that intermediate color. Marigolds are also a good companion plant for many other plants.


Here is the final result.


I was very pleased with this container for my first real attempt at flower arranging. These plants should look good for this growing season. The cordyline will need to be overwintered indoors when the temperatures get colder. The hellenium and the marigolds are both annuals that will fade away come fall while the yarrow could be put into mom's landscape for next year. I'll share a picture of it with you in a few weeks when it's all in bloom.

Happy Mother's Day Mom!

A Perfect Pot of Pansies

The other day I took this photo of a pot my mom put together of pansies and violas. I'm not much of a potted plant person so most of my plants go in the ground but I thought this easy to put together arrangement of annuals was perfect. The larger pansies went in the center and were planted around with the smaller violas. What I like is how the large and small size flowers contrast. They have similar coloring which helps them blend and makes the cool colored flowers work together very well!


Do you have any interesting potting arrangements to share?

The Pot Garden

Several years before we had a house with a little land we had to garden on our back porch. Friends and people I worked with thought we were crazy but it really makes a lot of sense. For small spaces gardening in pots is an excellent way to garden. Many vegetables come in varieties that are perfect for pots due to their small size or their growing habit. Here in this post you can see some of our back porch garden veggie pictures.


In the above picture you can see one of our first pot gardens.


Those same plants in the first picture eventually became the one's in this picture!


Cucumbers! In the left side of this picture you can see our compost bucket.

A little cucumber on it's way.


Tomato blossoms.


Radishes are good choices for pots.

Strawberries and tomatoes both grew well in pots. Our other veggies included summer squash, peppers, beans, and green onions.

Mmmmmmm!

In later years we needed more space. The shelving helped to make use of the vertical space. You can see my bean plants sprawling in the front.

If you garden in a pot the most important thing to remember is to water regularly. Plants dry out quick since they are exposed to more air than they would be if they were in the ground. Go for plastic pots over terracotta since terracotta pots dry out much faster. You may want to consider a drip irrigation system to help with the watering. Pot gardens just prove that you can garden almost anywhere. I hope you weren't thinking of some other kind of pot garden! We're talkin' veggies here!

The Dirt on Seed Starting Soil! (Seed Sowing 101 Part 2)

OK so you've gotten your big seed order in the mail, now what?  What do you use to actually start the seeds in?  What kind of pots?  What kind of soil?  After deciding what seeds to order you need to know what medium to plant your future garden in.  There are a lot of variables out there to choose from, let's take a look at a few options for starting your seeds for this Seed Sowing 101 post!

Tomato Seedlings
First of all there are some basic simple soils you can use to put your seeds into that will work fine.  Generally they consist of a combination of a few ingredients peat or coir for the bulk of it, perlite or vermiculite to add drainage and lighten the soil a bit, and maybe some sand to improve the drainage. 

Peat Vs. Coir

Peat has been the tried and true main seed starting soil ingredient for years but coir is catching on fast.  Coir is made from the waste hulls of coconuts while peat grows naturally and slowly in peat bogs.  There is some concern today about the sustainability of peat which is why many gardeners are leaning in favor of coconut coir. Either will work fine.

Vermiculite vs. Perlite

Both vermiculite and perlite are light materials that improve the drainage of soils but there is a major difference for the gardener be aware of.  Vermiculite added to soil works great to improve the drainage but there is an issue with some vermiculite containing asbestos.  Asbestos isn't a good thing!  I prefer perlite which is made from heated volcanic glass that resembles styrofoam bits and pieces.  You've probably seen it before and wondered "why in the world did they put styrofoam in my potting mix?"  Well they didn't!

Commercial Mix or Homemade?

You can go out and buy a commercial seed starting mix (which I've done many times) or you can make your own.  Generally it is cheaper to buy the raw ingredients and put together your own special blend.  It also gives you a great amount of control over what kind of plants you're starting.  For something that needs better drainage and lighter soil you would just put in a higher ratio of perlite to the mix.  You can even add in other ingredients like compost to create your own seed starting mix.  There is some evidence that completely composted compost (say that 5 times real fast!) has a positive effect against damping off!  So consider the compost! You could also buy the store bought seed starting mixes and add a little of your sifted and full decomposed compost from your compost bins. I'm convinced compost will save the world one day!

If you're short on time or lack of experience is a concern then there is nothing wrong with purchasing a ready to grow seed mix. Because these mixes do not contain many ingredients that will offer nutrition to the plants you may need to add some light fertilizer after the seeds have germinated.  (Please steer clear of synthetic fertilizers if at all possible!) Keep fertilization light at this point because you don't want too much green growth until a good root system is established.

Other options

I have used the peat pellets in the past and found them to be very easy for starting seeds.  The pellets, which resemble small dried disks, need moistened before seed starting.  Once the pellets been sufficiently moistened they expand into small cylinders of soil where you can plant your seeds.  I like the fact that you can plant these directly into the garden when the plants are strong enough or you can move the seedlings into larger pots without having to change pots around.  

Pots, Pots, Pots!

Cowpots from Gardener's Supply
I highly recommend using a biodegradable pots for your seeds.  Peat pots work great but there are other options.  Coir pots are catching on as are a unique product made from the waste of the dairy industry - Cowpots!  Cow pots take the composted manure and form it into pots that will actually provide nutrition to the soil.  I reviewed some cowpots last year and found them to be a pretty nice option.  The only downside is a little odor when wet - you wouldn't want them in the kitchen windowsill I think ;).  The odor is just one small negative when compared with a renewable resources that does an excellent job at growing plants.

Of course another excellent option for seed starting pots are the flats from all those plants you purchased last year!  6 packs work great if they are in good condition (they break down and tear easily) but I really like the idea of using a flat.  After you add soil to the flat and add enough water to dampen it you can plant it in mini-rows then transplant the young plants once they have their first set of true leaves. Or scatter sow in the flat! There are two awesome advantages to using a flat, one is that all the plants are in a single container and when the seedling flat needs moved there is only one container to deal with for all the seeds.  The other advantage is that when some seeds fail to germinate (which happens all the time) a whole container hasn't been wasted!  Avoid sowing different types of seeds in the same container or flat as that is a recipe for confusion!

Mushroom containers make great seed starting flats!
I've often used yogurt containers, mushroom containers and all sorts of plastic containers destined for the recycling bin to start seeds in so use your imagination when coming up with a container!  Just be sure to thoroughly clean out any containers that have been used before to reduce the chances of a pathogen hurting your seedlings.  (A 10% bleach 90% water solution will do the trick).

A lot of people have success using newspapers wrapped into a pot form or even cardboard tubes left over from toilet paper and paper towels.  There are many, many options for seed starting pots!

Growing The Home Garden Seed Sowing 101 Series
The next topic for Seed Sowing 101 will be all about timing!  Timing is everything right?  Or so they say!  Thanks for following along and if you've found this helpful please share it with your friends!