.

Showing posts with label trees. Show all posts
Showing posts with label trees. Show all posts
A Cool List of Trees
Now here is a cool list of trees for those who may like to bring a bit of the Smokey Mountains into their landscape. On the Great Smokey Mountains National Park website they have published a list of all the trees in the park and even included the non-native ones denoted with an asterisk. What I find interesting is where they have indicated how abundant the plants are. They have also included shrubs, sub-shrubs, and vines. Take a look!
Dogwood Seeds (Cornus florida)
 Have you ever wondered what the inside of a dogwood (Cornus florida) seed looks like? If you read yesterday's Name that Seed post you caught a glimpse of some dogwood seeds that were cleaned off by the birds. Many birds enjoy eating the berries that form on flowering trees. In this case the bird ate the fleshy outer covering of the drupe leaving behind a more unfamiliar seed. (These never saw the inside of a bird. If they had I would never have gathered them so cavalierly!) Dogwood seeds need a period of stratification in order to break dormancy. A good way to simulate this is to put the seeds in a bag of moist (not soaking) potting medium in a plastic bag and put it in a refrigerator for about three months. In the spring plant the seeds into a pot and let them grow. Once fall arrives the small saplings can be planted in the ground or transplanted as needed. Eventually they will produce wonderful white displays in the springtime.
Dogwoods enjoy shade and thrive in understory conditions. They are a native tree to the eastern United States that grows up to 30 feet tall but tend to be much shorter. You can see some of the white flowers of the dogwood blooming with the redbuds (Cercis canadensis) along our back property line.
The winner of Name that Seed is Gail of Clay and Limestone! She really knows her seeds!
What Seeds Are We?
Can you guess what seeds these are?
If you guess a certain state tree you wouldn't be far.

No prize for the winners,
just a job well done!
I thought a little game,
might make winter more fun!
Arbor Day Experiment (Part 2-2)
 In one of my last posts I mentioned receiving my free Arbor Day trees. Those trees have now been planted. While planting them I was pleasantly surprised by a couple things.
1. The trees were marked very clearly with the color coding system. It was not just a thin little line above the roots indicating which tree they were, but rather a very large blot. This made identifying the twigs a lot easier.
2. The root systems were in great shape! It may have been since they were in the ground so long before shipping because the weather has stayed warmer longer.
There was one tree that may have arrived dead but I planted it anyway just in case.
Here's what I did!
 I put 8 of my saplings into a trough planter that was used last year for some trees. I mixed together some potting soil and some mulch for improved drainage then put the little trees into appropriately sized holes for the roots. Finally I mulched the planter and put it into a sheltered location. I did the same with the hemlocks only I used two small pots instead of a planter. The little sprigs should do fine over the winter.
Arbor Day Experiment Part 1
Arbor Day Experiment Part 2
Arbor Day Experiment (Part 2)
Part two of my Arbor Day experiment will begin soon! Today I received my 10 free trees. I found them unceremoniously shoved into my mailbox courtesy of the U.S. Postal Service. Fortunately I don't think any damage was done. I would think that a package that has LIVE PLANTS in big letters on the outside of it would dropped off by the door and not shoved into a mailbox shorter than the package! But enough complaining, on to the trees!
I was able to choose from several of the available free tree packages and picked the Wild Bird Garden. It's a selection of trees and shrubs that make good habitats or food sources for birds and wildlife. Here are the plants that came in it: a Burr Oak, a Northern Red Oak, an Arrowwood Viburnum, a River Birch, a Gray Dogwood, a Tulip tree, two Canadian Hemlocks, a Sargent Crabapple, and a Washington Hawthorne. The package came with a pamphlet that has descriptions for the trees as well as a leaf identification page. This could be very useful in the spring when the leaves begin to show. Each tree is supposed to be labeled with a color just above the roots but I know from planting some free Arbor Day trees last year that the paint marks can be very hard to read and the leaf identification guide could be useful in identifying them.
I have not examined the trees very closely since the instructions said not to open them unless you can plant right away. I stored the saplings in the garage where they would rest in cooler temperates until I could take care of them, hopefully tomorrow. The baby trees will have a temporary home in a trough-like planter since I don't have permanent locations picked out. I'll have to think very hard about where to put those trees, especially the oaks. Though I may never live to see it, the Burr Oak can reach 80 feet tall with a similar spread. (Not exactly a small tree!)
There's more to come later about my Arbor Day experiment! If you haven't already you can read about part one by clicking here!
I was able to choose from several of the available free tree packages and picked the Wild Bird Garden. It's a selection of trees and shrubs that make good habitats or food sources for birds and wildlife. Here are the plants that came in it: a Burr Oak, a Northern Red Oak, an Arrowwood Viburnum, a River Birch, a Gray Dogwood, a Tulip tree, two Canadian Hemlocks, a Sargent Crabapple, and a Washington Hawthorne. The package came with a pamphlet that has descriptions for the trees as well as a leaf identification page. This could be very useful in the spring when the leaves begin to show. Each tree is supposed to be labeled with a color just above the roots but I know from planting some free Arbor Day trees last year that the paint marks can be very hard to read and the leaf identification guide could be useful in identifying them.
I have not examined the trees very closely since the instructions said not to open them unless you can plant right away. I stored the saplings in the garage where they would rest in cooler temperates until I could take care of them, hopefully tomorrow. The baby trees will have a temporary home in a trough-like planter since I don't have permanent locations picked out. I'll have to think very hard about where to put those trees, especially the oaks. Though I may never live to see it, the Burr Oak can reach 80 feet tall with a similar spread. (Not exactly a small tree!)
There's more to come later about my Arbor Day experiment! If you haven't already you can read about part one by clicking here!
Arbor Day Experiment (Part 1)
They finally came! My experiment with Arbor Day has begun. Earlier in the year I ordered several trees from the National Arbor Day Society. I also got a few free trees with my order. I know many people have had mixed results when ordering from Arbor Day. They either have trees that don't make it through the winter, receive dead trees, or get the wrong plant. Most of what I received was in good condition, not perfect, but good. My ornamental cherry tree had one branch that was broken at the top and one on the side. The little hemlocks I got were very little (not a big surprise) and one of the four had lost quite a few leaves. I received two free red maples that seemed to be in good shape with adequate root systems for the size trees they were (3 foot). I also got a couple free forsythias that looked pretty good. One even had a side chute that had its own roots, had I been more industrious I would have cut it from the main stem and let it be its own plant. Since I had plenty to do I didn't worry about it.
The trees were sent wrapped in wet packing material that looked like strips of paper. Underneath the paper the roots were coated with a water retaining crystal material to keep them moist. The trees were attached to a bamboo stake for support. The roots of the trees were wrapped in plastic bags then the whole set of trees was placed into a triangular shaped cardboard box for shipping. Here's a picture of the trees in their packing material on the right.
Impressive right?
OK maybe not, but they're tiny trees, every tree starts out small.
The instructions said to soak them for 3-6 hours before planting. I did not have 3-6 hours to soak the trees from when they were delivered to when I planted them, instead I put them in a bucket of water for the length of time it took me to dig the holes.
See bucket:
 See Bucket with plants:

The hole digging was easy as the ground was still a bit wet from rain on the previous day. It's amazing how different the dirt can be from one side of the lot to the other. Near the street the ground is almost all clay and toward the back is a very rich dark dirt with lots of worms.
Here are the trees that I planted:
Some people don't like the sweetgum because of its burrs but its fall color can be spectacular. This particular tree had some good roots (see picture on right). It went into the ground on the eastern side of our back yard. There is a tree near there that it will eventually replace. The two red maples were free trees and are planted in the back to section off the area to eventually make a wooded glade. The sugar maple is parallel to our Red Sunset maple about 30 feet or so from our house. The birch is planted behind the birdbath garden to create shelter for the birds. The Yoshino Cherry is in the front yard because of its spring flower display along with the forsythias which are next to the road. Two of the forsythias are on one corner of our lot and the other near the mailbox. The second birch is located in the back near a water runoff area. Since the natural habitat for river birches is along side banks and streams it should be able to handle the extra moisture. One of the hemlocks joined our hemlock hedge and the other three were potted up since they were kind of small. The red osier dogwood was put into our front garden bed temporarily until I can remove and replace the hollies there.
To plant the trees I dug hole about 12-18 inches in diameter then churned up the dirt in the holes. I did not amend the holes since I want the trees to get used to the soil they will be growing in for the rest of their lives. I placed the trees into the holes with the crown of the roots just above the soil line. Then I watered the trees and mulched. Two and a half hours later I was done.
Will they live? Thats the question! I'll update on their progress for spring with before and after pictures. Right now the before pictures just look like sticks in the ground! The only plants I am concerned about are the hemlocks. They don't look very strong but we'll see!
The trees were sent wrapped in wet packing material that looked like strips of paper. Underneath the
 paper the roots were coated with a water retaining crystal material to keep them moist. The trees were attached to a bamboo stake for support. The roots of the trees were wrapped in plastic bags then the whole set of trees was placed into a triangular shaped cardboard box for shipping. Here's a picture of the trees in their packing material on the right.
Impressive right?
OK maybe not, but they're tiny trees, every tree starts out small.
The instructions said to soak them for 3-6 hours before planting. I did not have 3-6 hours to soak the trees from when they were delivered to when I planted them, instead I put them in a bucket of water for the length of time it took me to dig the holes.
See bucket:


The hole digging was easy as the ground was still a bit wet from rain on the previous day. It's amazing how different the dirt can be from one side of the lot to the other. Near the street the ground is almost all clay and toward the back is a very rich dark dirt with lots of worms.
Here are the trees that I planted:
American Sweetgum, Two Red Maples, Sugar Maple, Two River Birches, Three Forsythias, Yoshino Cherry, Four Canadian Hemlocks, Red Osier Dogwood
Some people don't like the sweetgum because of its burrs but its fall color can be spectacular.
 This particular tree had some good roots (see picture on right). It went into the ground on the eastern side of our back yard. There is a tree near there that it will eventually replace. The two red maples were free trees and are planted in the back to section off the area to eventually make a wooded glade. The sugar maple is parallel to our Red Sunset maple about 30 feet or so from our house. The birch is planted behind the birdbath garden to create shelter for the birds. The Yoshino Cherry is in the front yard because of its spring flower display along with the forsythias which are next to the road. Two of the forsythias are on one corner of our lot and the other near the mailbox. The second birch is located in the back near a water runoff area. Since the natural habitat for river birches is along side banks and streams it should be able to handle the extra moisture. One of the hemlocks joined our hemlock hedge and the other three were potted up since they were kind of small. The red osier dogwood was put into our front garden bed temporarily until I can remove and replace the hollies there.
To plant the trees I dug hole about 12-18 inches in diameter then churned up the dirt in the holes. I did not amend the holes since I want the trees to get used to the soil they will be growing in for the rest of their lives. I placed the trees into the holes with the crown of the roots just above the soil line. Then I watered the trees and mulched. Two and a half hours later I was done.
Will they live? Thats the question! I'll update on their progress for spring with before and after pictures. Right now the before pictures just look like sticks in the ground! The only plants I am concerned about are the hemlocks. They don't look very strong but we'll see!
December Skyscapes
A view of our southern sky with the skeletal tree branches making an interesting skyline.


A sunset with dark red clouds reflecting the light of the western sun.


5 Plants I Want in Every Garden
Our current garden is still a work in progress, as every garden will ever be, but sometimes I like to think about what my next garden will be like. We have no immediate plans to move but one day our growing family will need more room in the house (and with two girls probably more bathrooms!). When that day comes there are several plants from my garden that I enjoy so much I will be sure to replant in that new garden. My list for this post isn't all inclusive (or ranked in any way) but here are five plants that I will be sure to get established in any new garden in the future!
Catmint (Nepeta x faassenii 'Walker's Low')
I like catmint for several reasons. It's a constant bloomer. It always seems to be one of the first perennials to get going in mid-spring and one of the last perennials to stop blooming for fall. Catmint attracts pollinators constantly and would be a great asset to a vegetable garden for that reason but also as a pest repellent. Not much bothers a catmint! The leaves smell great too and can be used in herbal teas.
Poppies
Poppies would be another plant for any garden. Poppies are extremely easy to grow and if you allow them to set seed they will self-sow. I planted the red poppies here in this garden from a free packet of seeds several years ago and ever since they have gifted the garden with their beauty during spring.
Japanese Maple
Who wouldn't want a beautiful Japanese maple tree in their garden? I plan on keeping several in my gardens. Right now we have six Japanese maples planted. They were all planted as relatively small plants (they can be quite expensive otherwise!). My most recent planting was a 'Crimson Queen' which is a beautiful weeping maple with dissected leaves. It's a slow grower and will only reach about 5 feet tall in ten years or so.

Coneflower
Coneflowers may be a common perennial, but for good reason! They attract pollinators like magnets, they look great, self-sow nicely, and need very little care. The only issue I have had has been from caterpillar damage in the fall when the silvery checkerspot larvae are hungry. Of course that isn't even an issue if I consider my coneflowers a butterfly host plant!

Heuchera
For the last of the five let's look at the heuchera! This one is 'Silver Scrolls' but I like so many varieties of heuchera I can't pick just one. Heuchera is one of the plants in my garden that is never bothered by deer or rabbits. The only maintenance my heucheras needs is the removal of dead flower stems and an occasional division although I don't consider dividing plants as work!

Catmint (Nepeta x faassenii 'Walker's Low')
I like catmint for several reasons. It's a constant bloomer. It always seems to be one of the first perennials to get going in mid-spring and one of the last perennials to stop blooming for fall. Catmint attracts pollinators constantly and would be a great asset to a vegetable garden for that reason but also as a pest repellent. Not much bothers a catmint! The leaves smell great too and can be used in herbal teas.
 |
| Catmint on lower left, Poppies to the upper right. |
Poppies
Poppies would be another plant for any garden. Poppies are extremely easy to grow and if you allow them to set seed they will self-sow. I planted the red poppies here in this garden from a free packet of seeds several years ago and ever since they have gifted the garden with their beauty during spring.
Japanese Maple
Who wouldn't want a beautiful Japanese maple tree in their garden? I plan on keeping several in my gardens. Right now we have six Japanese maples planted. They were all planted as relatively small plants (they can be quite expensive otherwise!). My most recent planting was a 'Crimson Queen' which is a beautiful weeping maple with dissected leaves. It's a slow grower and will only reach about 5 feet tall in ten years or so.

Coneflower
Coneflowers may be a common perennial, but for good reason! They attract pollinators like magnets, they look great, self-sow nicely, and need very little care. The only issue I have had has been from caterpillar damage in the fall when the silvery checkerspot larvae are hungry. Of course that isn't even an issue if I consider my coneflowers a butterfly host plant!

Heuchera
For the last of the five let's look at the heuchera! This one is 'Silver Scrolls' but I like so many varieties of heuchera I can't pick just one. Heuchera is one of the plants in my garden that is never bothered by deer or rabbits. The only maintenance my heucheras needs is the removal of dead flower stems and an occasional division although I don't consider dividing plants as work!

There are so many more I could mention, I'll have to have a follow up post!
How about you? What five plants would you plant in every new garden landscape?
Planting in Three Dimensions (3D)
When you plant a tree there are many things to consider about its location. The amount of sun it needs, the soil qualities and the size of the plant are some things that need to be considered. When you think about the size of the plant you need to think in three dimensions: the height of the tree, the diameter of the tree, and the root spread of the tree.
The First Dimension: The Height
The height of the tree is pretty self explanatory. Take some time to consider barriers to the trees height and plant appropriately. Watch out for power lines and other structures that are important to avoid. Planting a large tree like a maple or oak underneath or too close to a power line is just asking for trouble, instead you should consider a smaller tree. Under story trees like the redbud and the dogwood tend to be smaller in size and will fit better beneath power lines and other man made structures.
The Second Dimension: The Diameter of the Canopy
You should space the tree so that the diameter of the canopy would be away from any obstacles in your yard. Don't plant too close to the house since fallen branches can cause considerable damage to your property. Don't forgot about the spread of the tree and consider how it will affect mowing or planting plants beneath it. You should think about where the shade will cover. Planting an appropriate deciduous tree near your house can help lower cooling bills in the summer.
The Third Dimension: The Roots
The roots will extend beyond the drip-line of the tree to reach for the water the tree needs to survive. The drip-line is the edge of the branches of the tree. Avoid placing your tree where the drip line will be near sewer lines or underground utility lines since the roots will eventually be in that area. Sidewalks could be a concern also as many trees have large roots that grow above ground. The roots could crack or break the concrete.
Don't forget about these three dimensions when planting your tree so you can avoid big mistakes! In fact I've been considering moving the willow I put in this fall. I was more concerned with providing a fast screen for privacy and did not consider all the problems associated with willows. Willows tend to drop sticks and small branches on a regular basis. The roots are also very adept at finding water. The location I put it in is still a good 25 feet away from any structures in my yard, but I think I want some more distance from our house. I have a couple of places in the backyard to move it to and I even have an idea of how to replace the willow. Fortunately the willow's roots should not have extended too far yet and I have time to correct my mistake!
The First Dimension: The Height
The height of the tree is pretty self explanatory. Take some time to consider barriers to the trees height and plant appropriately. Watch out for power lines and other structures that are important to avoid. Planting a large tree like a maple or oak underneath or too close to a power line is just asking for trouble, instead you should consider a smaller tree. Under story trees like the redbud and the dogwood tend to be smaller in size and will fit better beneath power lines and other man made structures.
The Second Dimension: The Diameter of the Canopy
You should space the tree so that the diameter of the canopy would be away from any obstacles in your yard. Don't plant too close to the house since fallen branches can cause considerable damage to your property. Don't forgot about the spread of the tree and consider how it will affect mowing or planting plants beneath it. You should think about where the shade will cover. Planting an appropriate deciduous tree near your house can help lower cooling bills in the summer.
The Third Dimension: The Roots
The roots will extend beyond the drip-line of the tree to reach for the water the tree needs to survive. The drip-line is the edge of the branches of the tree. Avoid placing your tree where the drip line will be near sewer lines or underground utility lines since the roots will eventually be in that area. Sidewalks could be a concern also as many trees have large roots that grow above ground. The roots could crack or break the concrete.
Don't forget about these three dimensions when planting your tree so you can avoid big mistakes! In fact I've been considering moving the willow I put in this fall. I was more concerned with providing a fast screen for privacy and did not consider all the problems associated with willows. Willows tend to drop sticks and small branches on a regular basis. The roots are also very adept at finding water. The location I put it in is still a good 25 feet away from any structures in my yard, but I think I want some more distance from our house. I have a couple of places in the backyard to move it to and I even have an idea of how to replace the willow. Fortunately the willow's roots should not have extended too far yet and I have time to correct my mistake!
Plant of the Week:Oak
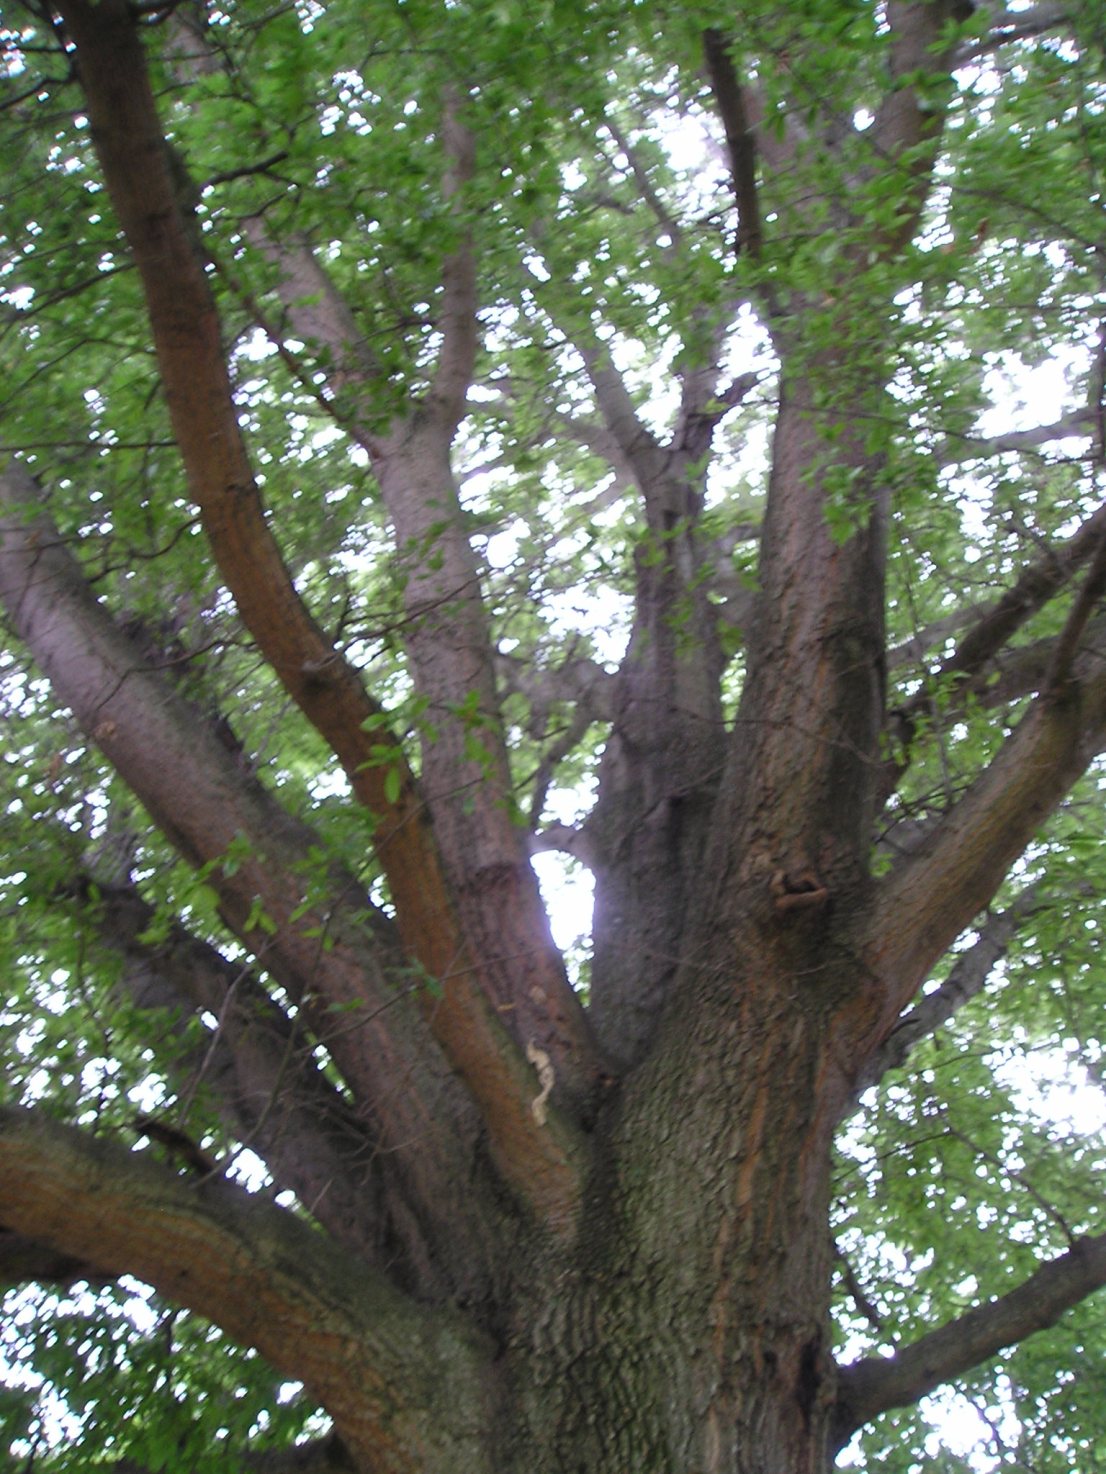 The plant of the week this past week was an oak tree. This tree is actually in West Tennessee at my wife's grandmother's house. It is a very large and majestic tree that provides great shade and a bounty of acorns each year. The picture was taken from the base of the tree looking up at the canopy. As for the exact type of oak I suspect it is one of two possible candidates: the willow oak or the shingle oak.
The willow oak and shingle oak can be sometimes be confused due to the similar nature of their leaves. Each leaf is narrow and oval shaped as opposed to the ridged and pointed leaves of other oaks. The leaves of the shingle oak (Quercus imbricaria) tend to be longer than the willow oak (Quercus phellos).
For more information and a quick identification guide follow this link (pdf file):
The University of Tennessee Extension: Identifying Oak Trees Native to Tennessee
What to Do With Acorns

Here's the reason why:

My other thought of course is that I would like to have an oak or two myself and maybe donate a few others to my daughter's school which seems to be rather bare in the tree department. It's a relatively newer school with just a few plantings to add some greenery to the landscape. Some beautiful shade trees covering the playground areas would be ideal.
Another thought is that by making sure some of these trees grow into saplings and eventually into large oak trees I may be helping to reinvigorate the hardwood trees in Tennessee. There have been losses of old growth forests in our state but there are efforts underway to help preserve them.
How I'm Growing the Acorns
It takes acorns a long time to become a large tree but every tree has to start somewhere. While cuttings may be possible the large number of acorns each tree produces generally make propagating them from seed much easier. When gathering acorns I tried to select acorns that did not have any holes in them. That is a sure sign of a non-viable seed since a borer has decided to have lunch on that oak embryo. I placed 18 in a planter and covered them with a layer of soil equal to the size of the acorn. When planting I kept them about 3-4 inches apart. Once they sprout in the spring I'll need to transfer them to deep pots for their taproots to grow.
The rest of the acorns (and there may have been 100+) I spread in a holding bed then covered with a layer of soil as above. Hopefully my losses to rodents will be minimal but just in case that's why I planted some in the planter. Most species of oak require some cold stratification to germinate but rather than store them in the refrigerator (which I know my wife wouldn't be too pleased with) I decided to plant outside. It works for Mother Nature right? We should get an adequate number of chill days to allow some of the acorns to germinate properly. We'll will see!
Cherry Laurel (Prunus caroliniana)
 Meet Prunus caroliniana, better known as a cherry laurel. This evergreen tree makes an excellent privacy screen and is great for attracting birds. It's a native to the eastern United States from Florida on up to North Carolina. It very low maintanence as my parents can attest. Just plant it and water it then let it grow. They planted cherry laurels at at least two of their homes to use as privacy screens.
 The dark green foliage is very attractive. Cherry laurels can be treated as shrubs and pruned accordingly or could be trained as a tree by cutting away the lower branches and removing suckers as they appear. They can grow between 20-40 feet tall. According to Floridata (a great place for information on individual plants) these trees are very easy to propagate either through seed or through cuttings. Can you guess what I'll be doing soon?

There were many more where that came from! In the spring time white flowers cover these trees. Often the foliage hides the flowers from view but a quick inspection will find them easily. They like full sun but are tolerant of shady places. I haven't seen any pests or diseases on these cherry laurels which leads me to believe that they are relatively safe from either ailment.
What's good about Cherry Laurel (Prunus caroliniana)?
- Evergeen color
- Spring Flowers
- Fall Berries
- Propagates easily!
Red Twig Dogwoods (Cornus stolonifera) and Why I Like Them
Why do I like Red Twig Dogwoods (Cornus sericea or Cornus stolonifera)? If you look in the picture below the reason should become red-ily apparent. The multibranched shrubs stand out with a bright red coloring that looks fantastic in the wintertime. When the trees are bereft of leaves and the stems are left, the red twigs won't disappoint for winter color.

These particular plants are in a nursery and unfortunately not in my garden but one day our little red twig dogwoods will grow into fine landscape specimens! Red twig dogwoods flower in the spring, exhibit a lush canopy of green in the summer, display berries in the summer and fall, change colors with other deciduous trees and shrubs, and show their characteristic bright red stem display in the winter. It's truly a plant with four season interest but most people, including myself, love it for the red stems. The stems will eventually fade from being the bright red and will change into a brown color. An occasional pruning of the older stems will force new stems to grow which will turn red for the fall. These shrubs sucker readily and grow fairly fast which makes them fun for propagating! They like moist locations but do well in a range of soils in zones 3-8.
So Why Do I Like Them?
Related Posts:
10 Easy Plants to Propagate for Your Home Garden
Red Twig Dogwood Propagation
A Plant for Winter Interest

These particular plants are in a nursery and unfortunately not in my garden but one day our little red twig dogwoods will grow into fine landscape specimens! Red twig dogwoods flower in the spring, exhibit a lush canopy of green in the summer, display berries in the summer and fall, change colors with other deciduous trees and shrubs, and show their characteristic bright red stem display in the winter. It's truly a plant with four season interest but most people, including myself, love it for the red stems. The stems will eventually fade from being the bright red and will change into a brown color. An occasional pruning of the older stems will force new stems to grow which will turn red for the fall. These shrubs sucker readily and grow fairly fast which makes them fun for propagating! They like moist locations but do well in a range of soils in zones 3-8.
So Why Do I Like Them?
- Four Season Interest
- Bright Red Stems
- Spring Flowers
- Easy to Propagate by cuttings!
Related Posts:
10 Easy Plants to Propagate for Your Home Garden
Red Twig Dogwood Propagation
A Plant for Winter Interest
Cedar Waxwings Near a Cedar Glade
Over Thanksgiving we spent some time in Mt. Juliet at my in-laws home. I always enjoy traipsing around the woods near their house just to explore. I did that often as a kid at my grandfather's house and I've always been fond of spending time in the great outdoors. Often I come home with rocks for my garden borders but I almost always can find a neat picture of some kind to share. The wooded area near their home is similar to the cedar glades that are prevalent in the region. Cedar glades usually consist of plants that can thrive in heavy limestone rock like cedar trees! Not far the east of their home is the Cedars of Lebanon State Park which is well known for its cedar glades.
While exploring I managed to spot a small winged creature that I've only seen twice before. It was a cedar waxwing. I saw one once in a crape myrtle tree at my parent's house but years before that I saw several in the Smoky Mountains. The one I saw this weekend was high up in a tree surveying the land. It didn't move much and allowed me to get the following pictures. I wish my lenses had a higher magnification to get a higher quality picture.

I'm sure there were more flying about somewhere since they like to travel in small groups.

It is very likely that they were in the area feasting on the bright blue cones of the Eastern Cedar (Juniperus virginiana) which are producing them in massive quantities this time of year.

While exploring I managed to spot a small winged creature that I've only seen twice before. It was a cedar waxwing. I saw one once in a crape myrtle tree at my parent's house but years before that I saw several in the Smoky Mountains. The one I saw this weekend was high up in a tree surveying the land. It didn't move much and allowed me to get the following pictures. I wish my lenses had a higher magnification to get a higher quality picture.

I'm sure there were more flying about somewhere since they like to travel in small groups.

It is very likely that they were in the area feasting on the bright blue cones of the Eastern Cedar (Juniperus virginiana) which are producing them in massive quantities this time of year.

Did you see any interesting wildlife over Thanksgiving?
Trees Trees Trees
Trees serve as the backbone of the garden. Trees add structure and height, clean the air, filter water, prevent soil erosion, provide shade and can be a habitat for wildlife. If you have ever sat beneath a maple tree in the heat of summer and enjoyed the cool shade it provided you understand the value of that tree. To me planting a tree is a no brainer, the more the better!
It takes time for trees to grow into a well structured specimen with a great canopy so they should be the first plants put into a landscape. You could splurge and buy trees that are already mature but these are expensive and the root ball can be difficult to plant by yourself. Smaller trees can catch up significantly to the larger ones in a couple seasons since those large root balls have to recover for the missing roots that were cut when they were removed from the nursery.
When buying a tree check the root systems to make sure it isn't pot bound. Look at the foliage for damage caused by disease and check the trunk for bark damage.
Our landscape had two trees in the front yard, both of which are Bradford pears (one of the most over-planted trees in Tennessee).
Here is what we added so far:
1 Red Sunset Maple (Acer rubrum 'Franksred')
4 Canadian Hemlock (Tsuga canadensis)
1 Green Weeping Willow (Salix alba)
2 Eastern redbud (Cercis canadensis)
We planted the maple for the fall color and the shade and the hemlocks to form a privacy hedge on one side of the house. I've always like the form of the weeping willows and this one will help to make a summer screen for our deck. The redbuds are native to Tennessee and have great purple spring blossoms.
There are quite a few more trees coming from the Arbor Day Foundation so once I get them planted I'll add to the list. We also added several shrubs but I'll save them for later.
It takes time for trees to grow into a well structured specimen with a great canopy so they should be the first plants put into a landscape. You could splurge and buy trees that are already mature but these are expensive and the root ball can be difficult to plant by yourself. Smaller trees can catch up significantly to the larger ones in a couple seasons since those large root balls have to recover for the missing roots that were cut when they were removed from the nursery.
When buying a tree check the root systems to make sure it isn't pot bound. Look at the foliage for damage caused by disease and check the trunk for bark damage.
Our landscape had two trees in the front yard, both of which are Bradford pears (one of the most over-planted trees in Tennessee).
Here is what we added so far:
1 Red Sunset Maple (Acer rubrum 'Franksred')
4 Canadian Hemlock (Tsuga canadensis)
1 Green Weeping Willow (Salix alba)
2 Eastern redbud (Cercis canadensis)
We planted the maple for the fall color and the shade and the hemlocks to form a privacy hedge on one side of the house. I've always like the form of the weeping willows and this one will help to make a summer screen for our deck. The redbuds are native to Tennessee and have great purple spring blossoms.
There are quite a few more trees coming from the Arbor Day Foundation so once I get them planted I'll add to the list. We also added several shrubs but I'll save them for later.
Holding Strong (Crape Myrtle Fall Color)
 These two crepe myrtles are holding strong to their color. Although these bright red and orange beauties are not mine, I did manage to get a couple seedlings from them to plant in my yard. Most people think of crepe myrtles for their summer flowering colors, but these two are evidence that there is more to a myrtle than meets the eye. I only hope that next fall my crepe myrtles can be as bright and colorful on a cold and cloudy Thanksgiving day!
Don't Commit Crape Murder

Why do people desecrate such a noble tree? I hope it is only ignorance. People for years have trimmed them in this fashion and turned them into lollipops of color. If you drive through commercial developments you will find many magnificent myrtles murdered in what can only be an ill conceived notion that it looks nice. OK maybe that's just my opinion but if you ask me crape myrtles should be allowed to freely express their "inner treeness". They should be allowed to stretch into the sky in the fashion that mother nature intended and not pruned into a stubby little shrub.
Go natural! Keep the suckers away and allow the tree to grow into a 3-5 trunk landscape focal point. Crape myrtles flower on new wood which is why they are frequently pruned so dramatically but you completely lose the winter bark interest that develops over time. As the trunk gets thicker smooth multicolored peeling bark forms. Topping the crape myrtle will create thick lower trunks and spindly upper trunks which in the winter look very unnatural without the bark interest.
The Clemson University Extension has a couple of great pictures on their site that illustrate crape myrtle pruning. The first picture on their page shows one trimmed properly into a natural looking form while the second one shows the results of tree topping. I know which method I prefer, how about you?
Plant of the Week:Hemlock
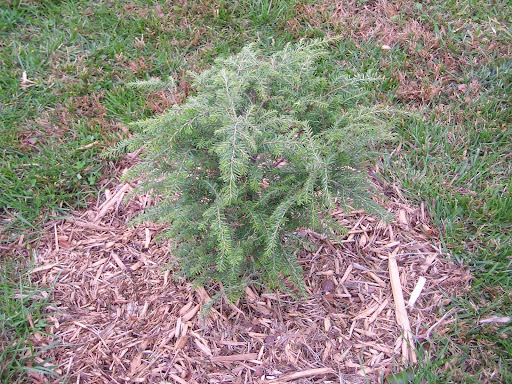
We planted four little hemlocks to eventually become a privacy screen along our property line.
Morning Mists
As the summer fades and cooler temperatures arrive the play of the sunlight in the mist and the trees can bring a very picturesque scene. This photo was taken one early October morning from our back deck.

Rootbeer anyone?
 I picked up this sassafras leaf in our backyard. I was struck by its interesting coloration, red on the outside edges and orange around the main veins of the leaf. We have sassafras trees everywhere around in our yard so their leaves are easily found. They have a very strong lemon scent that can be smelled when you crush the leaves. I've done that more than a few times with my lawnmower!
Apparently the roots of the sassafras tree used to be distilled to make root beer. I'd rather just go buy a 12 pack of good old A&W than worry with digging up those roots!