.

Showing posts with label raised beds. Show all posts

A 10'x2' Raised Bed for the Vegetable Garden

Each year I expand my vegetable garden just a little. I use raised beds which just can't be beat for productivity in the backyard vegetable garden and so this year I'm planning on adding four more raised beds. These four raised beds may just be the last of the raised beds in the vegetable garden for the foreseeable future so I want to make sure that they are functional, productive, easy to work with, and look good with all the other raised beds.

Raised beds are not hard to make and can come in a variety of ways from a mound of soil that is raised in the center and slopes to the outside, to hay bales as edging, or to what I usually use: non-pressure treated lumber.  Ceder wood is the best since it is rot resistant but I've been going on the cheap side with regular old pine. It rots in 2-3 years but that rotting material nourishes the soil and can eventually be replaced with something nicer like brick or cedar when more money is available.


The Raised Bed Plan/Layout:


raised bed layout, vegetable garden, plan

The basic idea for this raised bed vegetable garden layout is to allow easy access to all the plants. By making the raised beds only 2 feet wide I can guarantee that I can reach anywhere in the bed. Typically I've been using 4 foot wide beds for my other layouts and sometimes it can be very difficult to reach the very center of the bed especially if you are not a very tall person (i.e. my kids or my wife ;)) Often the plants themselves can impede the gardener while trying to reach across to the far side of other vegetables. I'm all about making things as easy as possible! (even though frequently I end up making things more difficult) In the plan above I allowed a 2' square for each tomato plant and allowed for some interplanting space in between.

Companion planting is a good way to maximize space and reduce possible insect and pest damage.  One of my favorite companion planting combinations is basil and tomatoes which is what I have highlighted in the plan above.  (I have a theory that if you would eat it together you can plant it together although I'm not sure if that holds true for all vegetables!) Another idea would be to substitute marigolds as they are said to help reduce damaging root-knot nematodes on tomato plants. A 2 foot square for tomatoes should work fine since the tomatoes will grow deep and be trellised in some way. The bed divides itself into five 2 foot sections which will provide some space for air to flow around the plants (important for preventing fungal diseases).

This year each of the new 10'x2' raised beds will be used for tomatoes. I like to rotate my vegetables from location to location and since tomatoes have been in each of my beds over the course of the last two years I decided that the new beds is the best place for the tomatoes to go. The diseases remaining in the soil of the former tomato beds won't effect other vegetable families and I can rotate the tomatoes back in after a couple years in other locations. Hopefully by then the soil diseases will be gone.


Are you expanding your vegetable garden for 2010?

Other Garden Layouts and Plans
 
Fall Vegetable Planting Layout
Vegetable Garden Layout Comparison
11 Things to Think About When Designing a Raised Bed Vegetable Garden
Vegetable Garden Layout Using Raised Beds
My Original Vegetable Garden Layout (The L's)

Reusing Materials for a Cold Frame

Over the weekend I spent about 30 minutes piecing together a cold frame to do some hardwood cuttings.  The process for building a cold frame is very similar to building a raised bed.  I used some old pressure treated lumber that used to belong to a deck, an old storm door without the glass, and a couple 4"x4" scrap pieces to make some secure corners.  Pressure treated wood, depending on its age, may contain arsenic but newer pressure treated wood used copper based treatments to preserve it.  Since this bed is for cuttings and not vegetables there's no reason to worry about the arsenic.  (I suspect the wood I'm using was treated with the copper treatment.)


I cut the wood to fit the storm door then used some 2" deck screws to secure it to the corner posts.  A flat surface is very helpful - mine wasn't!  Underneath the bed I laid a thick layer of newspaper to prevent any weeds from rising up and through the bottom of the bed.  Then I placed a plastic mesh that I had on hand to protect my trees from deer. I have voles in my yard and I need to protect the bed from them.  Most likely they will be able to nibble through the plastic but its what I had on hand.  I may get some 12" paving stones to place under the bed to discourage them further.

Once I had the bed itself in place I used the storm door hinge and screwed it directly to the bed.  I need to come back and place a piece of plastic over the storm door opening.  The glass went on my shed's skylight a couple years ago so I don't have that available.  I'll come back and fill the bed with a rooting medium which will probably contain a mix of peat, sand, and perlite.


From start to (almost) finished this bed took about 30 minutes to put together and could hold between 200-300 cuttings.  For cuttings I'll probably start with some viburnums and crape myrtles.

Blank Slate

It will be fun to think of what next year's growing season will bring. The yard here is pretty much a blank slate still. I've done a few things, like making a garden bed or two, making a bird bath garden, and added trees but there is a lot left to do to fit my vision of what this yard could be. Everyday I can think of a new thing to add to the landscape. Today I started thinking about a small herb garden bordered with stone in the front yard near our walkway. I'll add that one to my to do list. Over in the right column of my blog I have the "Ever-Growing List." It's my to do list that just keeps growing, kind of like kudzu. As I knock off jobs I'll talk about them and post pictures of the process.

I'm looking forward to starting on the raised beds for my vegetable garden. This past year all I could do was plant some potted tomatoes and peppers which never amounted to much. Our house was fixer upper and much of our time and expense went into making it habitable. With the vegetable garden raised beds are definitely the way to go. I helped my parents build some a couple years ago and their veggies have produced more than they could eat.

What I'm planning will be a 2 year process. This first year I will build the basic wood frame out of 2"x8" boards. I plan on having 4 4'x6' beds and 2 4'x4' beds. I'll set them up into 2 "L" shapes. The second year I'll expand them to 16" tall. At least that is my current plan.

My next project will have to be planting the Arbor Day trees I ordered. The trees are only shipped when dormant so I haven't seen them yet but I can't wait to get them in the ground!

5 Situations that Call for Raised Beds

If you've followed Growing The Home Garden for any length of time you probably know that I'm a proponent of raised bed gardening.  Raised beds can be made of all sorts of materials and have all kinds of advantages for growing a garden.  Raised beds are great solution for many tricky situations in the garden. Here are a few ways that raised beds can help a garden that may have some issues!

5 Situations that Call for Raised Beds

  1. Poor soil.  Very few gardeners are lucky enough to have perfect soil for gardening.  You may have hard clay, very sandy soil, or even no soil!  Raised beds help in each of these situations by allowing the gardener to have control over the soil conditions.  The soil can be just right from the very beginning.  It can be filled with a combinations of soil, compost, and other materials to be exactly the right blend for what needs to grow there.
  2. Sloped gardens.  Often gardeners live on hillsides and may not have very much flat land to grow their crops.  Raised beds can adjust for the slope and create a terraced raised bed garden.  The raised beds level out the garden area and create flat surface which reduces soil erosion from the garden area.
  3. No Soil!  Sometimes you don't have any ground what-so-ever to plant the garden in.  When there is no ground a raised bed can be built on legs to make a raised bed table.  Raised beds can even be established over concrete areas.  
  4. For poor drainage areas.  If you have an area of your yard that is hard to grow plants in due to poor drainage raising the soil level may help and raised beds may correct those drainage issues.  It may take some special planning but with raised beds you can lift the plant roots away from the heavy moisture areas.
  5. For year round gardens.  Raised beds are easy to construct hoop houses over.  A few PVC pipes and a sheet of plastic can keep your garden growing in cold weather.  Cool season plants like spinach, chard, kale, lettuce and others can be harvested throughout the winter if kept covered and growing.


And one more!
  • For design or organization reasons.  Sometimes a gardener might want a garden that looks a little more formal. Raised beds make designing a garden in a parterre layout very easy.  It could be that the gardener wants to easily keep track of crop rotation or wants to incorporate flowers in various beds to attract beneficial insects through companion planting.  Raised beds can help a gardener stay organized and offer a lot of design options.  


Have you used raised beds to fix a tricky situation in your garden?

The November Vegetable Garden

It's finally time to get the chore to end all chores done: cleaning up the vegetable garden.  After a year of intermittent neglect, frustration, summer heat, and family tragedy it is definitely time to put this year's garden under wraps.  Mostly under wraps that is.  We actually have a crop of greens on the way to help feed the family and ease the budget.  

Here's the view of the left side of the garden.  The blue tarp is still down to prevent the Bermuda grass from taking over completely.  The next step for this area is to remove the tarp and the raised beds then till it.  Once tilled I'll remove as many Bermuda roots as possible.  I know I'll miss a few rhizomes but drastic measures must be taken to beat back the Bermuda.


On the right side of the garden I have quite a mess of strawberries.  Fortunately I didn't take a before picture when the strands of Johnson grass were still poking through the strawberry foliage. You'll just have to imagine it!  The patch of green way in the back is a combination of asparagus and chickweed.  Definitely not the ideal planting companion to asparagus! Chickweed just seems to invade everywhere this time of year.  Fortunately it's one of the easiest weeds to pull which is quite satisfying! 


Now I can show you the good side of the garden.  Here we have garlic interplanted with a combination of lettuce and spinach.  There's probably some cilantro here and there too since I seem to have it everywhere.  Sure makes me wonder why it's so expensive in the stores when it grows so well all on it's own!


Here are a few more of the seedlings.  I have the supplies for the PVC coldframe that will eventually be covering the greens but I don't have it all pieced together yet. Soon! 


There's no shortage of work to be done even though the cold weather is arriving.  I'm going to miss those warm fall days.  We'll get a few here and there but definitely not enough to suit my tastes!


For More Vegetable Gardening:

Raised Bed Vegetable Garden with Stone Borders

It's taken me all summer to get to it but I'm finally taking the first steps toward changing the vegetable garden to the parterre layout. I had some of the blocks sitting around for months now and others I borrowed from our patio sidewalk expansion which I just haven't had time to get to this summer.  Using the stone for the border is more expensive than wood but will last much longer.  


For a comparison take the $2.50 cost per foot of these stone blocks and compare it with a piece of lumber somewhere around $5-6 for a 10 foot piece.  That comes to about $0.50-$0.60 per foot which makes the stone about 5 times more expensive.  The big advantage is that it won't ever rot and it looks pretty good!


So far I only have one small portion of the raised bed vegetable garden put together.  Even it still needs several more blocks placed to complete the beds.   These beds are going to be planted ASAP with some more winter greens.  Pak choy sounds good and maybe more spinach.


Ever tried potatoes in the fall?  This one was a volunteer in a large nursery pot I was using for a weeding bucket.  I'm tempted to wrap the top area where you see the metal stakes in plastic to create a little greenhouse effect. I'm theorizing here but I might just be able to get some potatoes by December.  We'll see!  The neat thing about potatoes in a pot is that when they are ready all you need to do is dump the pot to get the potatoes.


How's your vegetable garden growing?

The Japanese Maple Garden

And now here comes my favorite part of the patio project so far. No project feels quite as complete as when you finally plant something. OK I suppose that only holds true for gardening projects but it really is the exciting part! Welcome to the Japanese Maple Garden! It's a small raised bed made from the edging stones that I used around the patio. To either side of the garden are the beginnings of pathways to the yard. They will be worked on in subsequent phases of our backyard project with the sidewalk pathway on the left tentatively scheduled for next year. I have to make sure I can get the work crew back for phase 2...oh wait, that's me! The pathway on the top side of the garden will be natural stone stepping stones inset in the grass so that I can mow over them easily.


The Japanese Maple Garden could not possibly be planted without what? The Japanese Maple! He's standing over there on the left side of the picture below. On the right is a Miscanthus sinensis 'Morning Light' I picked up for a dollar last week, I love those discount racks! Mr. Morning Light will only be there until the Japanese maple gets well established. I wanted a plant that would help shield the young maple from direct sunlight for a little while and an ornamental grass fit the bill. I might divide it in the spring. After I move him I have my eyes on some Muhly grass that would look really nice next to the Japanese maple.


Here's a view from the other side of the garden which would be on the patio. The pots on the far side are two lemon trees and a grapefruit tree I grew from seed. I won't show you how they look right now as they suffer from SNS (Summer Neglect Syndrome). I put them farther away from the house than I should have to conveniently water them. The grapefruit doesn't look bad but the lemons aren't very happy citrus trees right now. I hope they can make it through the winter in the garage alright! Anyway they are off topic, back to the Japanese maple garden!


Here is the miscanthus. It's planted on the western side of the garden and should help deflect some of the late afternoon rays.


Here' s the maple. I potted it up for the summer and kept it watered but it's roots overtook the pot and needed a larger place to grow. Fortunately now it has a new home! It's a little dry around the edges but it should bounce back shortly.


I also planted two discount threadleaf coreopsis plants in the garden. I'm not sure of the variety but they have a light purplish to pinkish colored bloom. On the other side will go two discount Penstemon 'Husker's Red' that I have in pots on the front porch. I'll move them into the ground before temperatures fall too much.


To prepare the new bed I double dug the ground to a shovel's depth. Then I covered the turned turn with newspaper and filled with dirt that was used in the patio excavation. I added a bag of peat moss to the top of the soil but I need to go back with a cultivator and mix it in more with the soil. Peat moss can add some good organic nutrients. Then I planted and mulched around the plants with a little pine bark mulch. I'll come back and add more to the rest of the bed when I get the chance.


Here's the bed from the patio view. On the right I'll put the penstemon and close to the patio I have a place to plant another plant. That spot is still open for now!


Growing The Fall Vegetable Garden

As I mentioned in a previous post about fall vegetable gardening we're in the window of opportunity for getting those fall veggies going. All those cool season vegetables you planted for spring are eligible for a second go round in the garden. In our garden the radishes are rising, the sugar snap peas are sown, and everything else is will be green and growing soon. It's all been planted and all that is left to do is to continue the weeding, monitor the watering, and to tolerate the waiting. I did alter my fall vegetable planting layout slightly. I was forced to change my bean area to a 2 foot by 4 foot section rather than the 1 foot by 4 foot section in the layout. Part of the reason was to make more beans for freezing but I do have to admit I forgot my layout when I was planting and accidentally doubled their area! That's fine by me though since green beans are regulars in our menus. It does mean I have to sacrifice some square footage originally intended for broccoli, but that's sacrifice my wife was ready to make!

This batch of bush beans is already producing. I planted them a couple weeks before our final batch of bush beans which you can see have sprouted in the next picture. There are a couple pole beans planted in the the bed that I need to stake up mixed with all the remaining seed from a packet about four years old. Seeds are amazing things, they can stay dormant for years then pop up and grow when the conditions are right.

The next batch of bush beans was planted in three irregular rows by my daughter and myself. Crooked rows don't matter as long as my daughter learned a little more about this gardening thing we love so much. My thought is to get the kids involved as often as I can to introduce that gardening habit. Kids who grow their own food and see where it comes from are more likely to eat it.
The radishes are coming up all over their area. I'll thin them out soon since I over planted them to ensure adequate coverage. 
I can't wait to see more sugar snap peas appear this fall. The few we had in the spring were so delicious that they never made it inside the house! I'll probably have to tape my mouth shut when picking the peas to avoid the same problem this fall. As an added benefit these are legumes which help to add nitrogen to the soil. I have them planted in an area that may house tomatoes next year and the extra nitrogen will help those tomatoes get a good green start.
 
And of course what vegetable is probably the most popular one in the fall for ornamental reasons?
 

It's the Great Pumpkin of course! Maybe this one will be something more impressive than last year's little pair of pumpkins. They aren't Atlantic Giants or anything terribly impressive just Jack-O-Lantern pumpkins but that's exactly what we're looking for.
I'm still waiting on the lettuce, spinach, cabbage, and beets to show their greenery. Another preview of fall weather is coming up this weekend which might entice the little leafy green veggies to show themselves. Several cucumber seedlings are not pictured in this post but are definitely on their way. We'll see what they can do before the frost takes them out in October.

Another Raised Bed, This Time on a Slope!

Today I spent some time outdoors getting a raised bed put together for our back slope. It gives the slope a somewhat terraced visual effect but the wooden bed isn't needed to hold the slope in place. It's done fine on its own for several years! Here's the view from one side with the garden shed to the left. The plant holding bed is a good 15-20 feet away from the willow tree and the new bed is on the far right. I've temporally added dried weeds over the soil in the bed.


Here's the view from between the shed and the willow. When my finances are better I may replace the wood beds with stone retaining wall blocks. The old wood won't last very long but I'm hoping for at least 2 years out of it. It used to be part of a deck and I'm fairly certain that the pressure treated properties (and chemicals) are completely leached out. Beyond the second raised bed I can imagine another set of raised beds with a small stairway in between. Now that's a project for another year! (Besides I'm almost out of old wood...)


The large raised bed in the back is around 28 feet long and 4-5 feet deep. The bed took most of the day to complete but now I have a bed ready for my strawberry plants to move into in a few weeks. I'll probably sneak a few other plants in the bed as I go - taller stuff that will enjoy having the strawberries as a groundcover. I still need to add soil and compost to fill the bed up higher.


How do you cope with gardening on a slope?

Building a Plant Holding Bed

A plant holding bed is a luxury that anyone who propagates plants might find very useful. (I know I will!) A plant holding bed can function as a coldframe or just as an out of the way spot set aside for plants to rest in while they grow. For me I just have too many propagated plants to continue storing them on our front porch - that's not what a front porch is for is it?  Building the hold bed was simply the next logical choice!

How to Build a Plant Holding Bed

This isn't rocket science but building a raised bed does require some thought. I spent some time (several minutes ;)) trying to figure out a good location that was out of the way and doesn't utilize yard space that we are actively using. The lower portion of this slope near the garden shed seemed ideal. It isn't close to the house but with an extra long garden hose I can get access to water. I'm also hoping to add a rain barrel to the side of my garden shed which would make an easy and free water source nearby.


The next step was actually figuring out the shape I wanted and staking it out. By staking the outline of the beds I could remove the soil and dig the bed into the slope of the hill. I left a lip on the back side of the beds  to prevent runoff water from going straight into the raised bed. I used a tiller to break up the surface of the soil, a rake, and a shovel to level the ground above the holding bed.


Then I set about building the rectangular portion of the bed. I used corner posts to screw (deck screws) in the boards which makes it easy to square off the corners. (Dimensions 4'x8') The corner posts are measured to the height of two board widths to make a nice fit (approx. 11 inches).


After the first level of the rectangular center bed was built I added the triangles on either side. The back board is 4 ft. long which I attached using another corner piece. The long hypotenuse side (geometry was a very useful class!) was measured and cut using 45 degree angles on the ends.


Here is the location after the first portion of the bed was built. 


Once the bottom level was complete it was easy to measure and cut the remaining board for the top layer.

The next step will be to add a cover to it to prevent our resident wildlife population from enjoying the plants more than I do! I have two thoughts on that:

  1. Use a PVC pipe frame with a plastic mesh over it or 
  2. Build a wood frame with a mesh. 
The wood would look nicer but PVC is be light weight and cheap. And I really like cheap! The wood also gives me added support if I choose to lay a window over the bed to covert it into a cold frame.


Here's where you can see how it fits in with the landscape. The future bed will house many of our strawberry plants that have overtaken the vegetable garden. That bed will be almost 27 feet long and will help to create a terraced hillside look. In between the two beds is a pathway wide enough for the riding mower to journey through.


I'll post more on the hill-scape when the next section is added!

Plant Holding Bin and a Birdhouse (Weekend Projects)

This weekend I worked on two garden projects. One took a a good deal of time to complete while the other only took about an hour and a half.

The big project was a plant holding bin to hold my propagated plants that aren't ready for in the ground planting yet. Fortunately I was the recipient of some old deck wood a couple years ago that since then has been resting comfortably in the back. Amazingly it is still in pretty decent shape after two years of sitting through our weather. I'll write a full post on its construction later this week but here is the finished product:


It's essentially a set of three raised beds that will be nestled into the slope of the hill. The middle one is 4'x8' and the two triangular raised beds are 4' on two sides and about 5'8" on the slope side (remember your Pythagorean formula here!) The bed on the left is in the shade for most of the day while the center and right bed receive part shade. Eventually there will be another bed further up the hill for some other plantings. This slope is part of a larger project to make a couple tiered gardens. So far I haven't spent any money on this project since the wood was old and donated and the screws were left over from garden shed construction. I need to add a lid that will keep the rabbits and deer from munching on my plants.

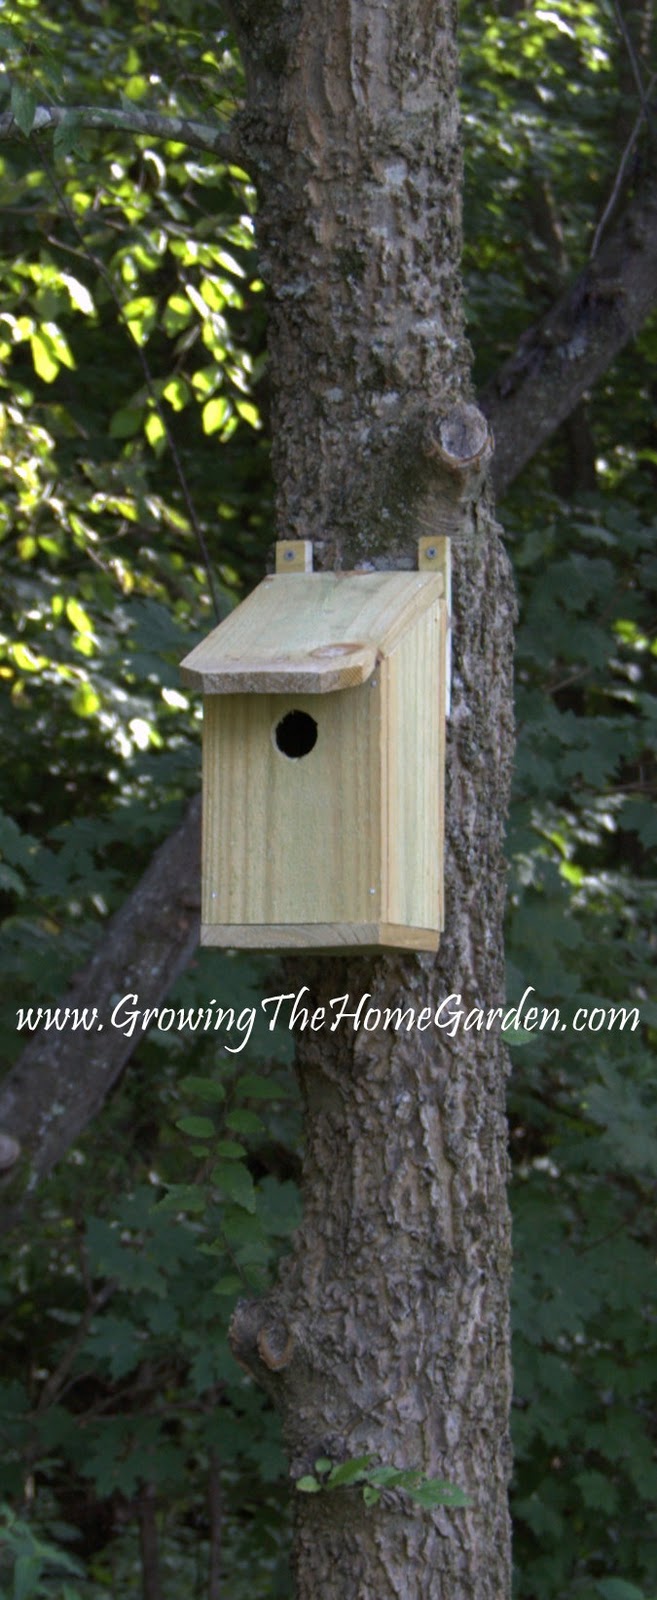
The short project of the weekend was a bird house. I've been itching to add one to the yard and had this idea to use a dogeared fence board to make one. It was a very easy project and came together quickly. I pre-drilled hole then used finishing nails to hold the sides together.  If you don't pre-drill holes you risk splitting the wood. (I'd say chances are about 90%!) I didn't use any written down measurements and sort of improvised the bird house. Many websites have the ideal dimensions for certain types of birds and I actually printed a list off of one of them but lost the list! The birdhouse turned out fine though for a first attempt. I'll improve upon my design with the next one. It was so easy to do that I have to make a few more!


How Tall Should a Raised Bed Be? (5 More Raised Bed Design Tips)

Have you ever wondered exactly how tall a raised bed should be?  Here's the answer: 11 and 5/16ths.  Yep that's right, 11 and 5/16ths.  Of course not!  The real answer is that the height of a raised bed is dependent on a number of factors which makes each situation different.  Today's Friday Fives post is another raised bed design post all about the height considerations when building a raised bed.  Hopefully this will be helpful as you plan you fall garden or even your spring garden for next year!

5 Considerations for Determining How Tall A Raised Bed Should Be!


  1. The most important thing for your plants is the soil.  It has all the nutrients and its where all the water will be stored after rains.  If you have rich, compost like soil already than you don't have to worry about how tall your bed will be.  In fact then you might not even want to worry with raised beds unless you just want them for convenience (more on that later) or appearance. If your soil is less than perfect - i.e. rock or clay - you will want more height so that you can add better soil on top where the plants will be happy.  Raised beds will eventually improve the soil conditions underneath as organic matter trickles down into the clay areas.
  2. What materials do you have available to use for you raised beds?  If you are planning on using lumber of some kind then you can build as high as you like fairly inexpensively. 
    When it comes to stone you will need some kind of mortar to hold the stones together as you gain height.  The same is true with concrete retaining wall blocks.  The other difficulty with tall stones or concrete raised beds is the time involved in building them.  The taller they are the longer it takes!  However you could build a layer or two one year then add to them the next and gradually build height.  
  3. Consider what plants you are growing. 
    Plants like potatoes that like to be buried then covered as they grow may need deeper raised beds than a more shallow rooted plant.  Vegetables with long roots like carrots or parsnips should be considered for the height of the raised bed especially if the soil quality underneath the raised beds is very poor.  Carrots like loamy soil with very few obstructions like rock or clay.  They find it difficult to grow long and straight and tend to end up producing funny looking tap roots! 
  4. The taller the raised beds are the quicker the soil will dry out.  As you build height you also build surface area around the sides.  The sun and air will move against the outside of your beds which increases the rate of evaporation and will dry the beds out faster.  Raised beds in general dry out faster than gardens planted in the ground so this may not be a major factor but should still be considered.  
  5. Convenience!  Raising the height of a garden as much as 24 inches can be a great boon for the handicapped or those who have trouble bending in the garden.  It makes weeding, watering and harvesting much easier on the body.  Tall raised beds are a great option for those who are having trouble gardening but still want to participate in the hobby they love!

I think in general that raised beds of any height improve a gardener's ability to garden.  They keep the soil in place and usually involve a higher quality organic rich soil than what was originally present in the soil.  If money is a concern consider building raised beds in mounds that slope down to the edges without any type of formal sides.  It's still a raised bed and will do the job nicely!


For more raised bed design tips please read Designing a Raised Bed Vegetable Garden: 11 Things to Think About!

Reclaiming the Vegetable Garden

To say that I am ashamed of certain spots in my garden is an understatement. Several gardens have become filled with weeds run amok and whether or not the weather is cooperative I have to get some work done. Today I spent some time outdoors in the 95 degree heat tackling a couple of the raised bed problem areas in the vegetable garden. The vegetable garden was priority number one since I still need to get a few more summer crops growing (squash, zucchini, and beans) and I need the space back from the weeds! If you want to know why the garden became so unruly just add family illnesses (the crud from you know where), an extremely hot June (+10 degrees at a minimum), and several other things that took time away from the garden all together. In short I wasn't spending enough time in the garden. Now that things are getting better (and everyone is healthy again) I'm on a mission to reclaim the gardens.


Raised beds are generally very easy to take care of and even when they become overgrown with weeds can be reclaimed in a fairly short time. What is really nice is that each bed gets broken up into it's own sub-task and gives you a clear sense of getting something done even when you aren't completely finished with the whole job. I managed to tackle three raised beds: two 4'x8' ones and one 3'x4' bed. One 4'x8' bed was completely overgrown with weedy persicaria. I can't stand that weed! It's shocking to me that they sell it in stores as an ornamental - one which I will never buy. Sure the cultivated variety is probably more tame but it's the principle of the thing! At least it is easy to pull up. The picture above is the bed after the removal of that weed. It has peppers on the left, peppers on the right, and left over rainbow chard from the spring plantings (The stems are pretty enough to look at so I thought I would just leave it for now!)


The other 4'x8' bed was covered in weedy grasses. Bermuda and crabgrass were competing with each other to the extent that the one plant I had left in the bed ('Moon and Stars' Watermelon) had crossed over a pathway and into another bed in an effort to escape the invaders! Above is the before picture and below is the after - yes I promise there is a raised bed in the first picture! Showing you a picture like the above shot is almost like posting a picture of myself in my underwear - very embarrassing. (Please note that the aforementioned statement will never happen!)


The small 3'x4' bed was easy to clear out since only a few weeds were there along with some squash plants decimated by squash bugs. It's time for the next crop of squash which hopefully will resist the squash bugs but it is very likely they will eventually succumb. The squash bugs have been my number one pest over the last couple years and while I try to prevent them by squishing the eggs there are always plenty that escape my sight.


What's your most embarrassing garden area?